HomeMi CasaTutorialsInteriors etcMurals and ArtworkPainted Furniture

Thursday, January 31, 2013

SUN RAYS FOR MI CASA

Recently, we've had some cloudy days.  This morning, the sun is shining through my living room window and the sun rays look so beautiful that I wanted to share these photos of my living room.


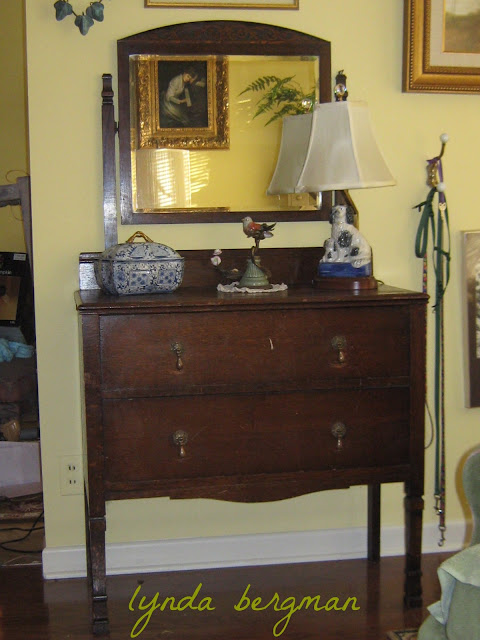
This mirror frame was in an architectural salvage place and when I saw it, I had to have it!  The finish was old and distressed, naturally.  On the left bottom, someone did a repair job and  a good one!  I added the mirror and it's in the perfect place over my sofa.


When my kids were very small, they would bring me unique pieces of wood, burr oak acorns, lots of things that attracted them and I would keep them in a special box.  Every once in a while, they would find a butterfly that was no longer alive, but still in good shape. ( Someone was probably spraying insecticide.  Please be organic around your home and yard.)  I saved them for years and then decided to put them in a shadow box.  I painted the back ground with oil paints and gently placed the butterflies in the scene.  They've been in these frames for many years and are still in perfect condition.  In my garden, once in a while, I will find a butterfly that is no longer alive and it always makes me think of a little boy finding it and bringing it home to show his mama.


I love blue accents.


When Mollie was smaller (a lot smaller than now) she loved to sleep in this bowl.


My little doggie!!  He has claimed this oversized chenille chair by our large window and front door.  He guards the neighborhood and our front door.  Feb 12 is his birthday and he'll be 9 yrs. old.  Best little doggie in the world!!


When I first purchased my home, there was a huge air conditioner in this wall.  When I got central air, I designed this wall cabinet to go where the a/c had been.  I found the middle stained glass door and designed my cabinet around it. My living room is small, so I had the carpenter build the cabinet into my garage and the cabinet front in my living room.  


This beautiful angel (and Charlie) guard my front door.

Wednesday, January 30, 2013

GAYLE'S GUEST BATH FROM OUTDATED STAINED WOOD TO OFF WHITE CABINETS

     This is the project I was doing for Gayle, this week.  In one of her guest baths, the cabinets were stained wood.  She thought the cabinets were a bit outdated, she was ready for a change and she wanted me to paint them off white.


She will be getting new handles for her newly painted bathroom cabinets.  The off white paint is such a contrast to the dark stained wood that they used to be.

The primer and paint that I used were both oil based.  I prefer using oil on cabinets and woodwork.  It just makes a nicer and harder finish, in my opinion.  But, recently, a client wanted me to use a water based paint on his linen cabinet, to match the other paint in his house and it was very easy to use and looked very nice.  I just happen to prefer oil.  And, cleaning my tools was so much easier with the latex/water based paint.


Gayle was very happy with the transformation.  She's such a good decorator that I know it will be beautiful after she gets new handles, new blinds and new colors in there.
I've worked for Gayle for years and really appreciate her calling me, again.
Thank you, Gayle!!
  

Sunday, January 27, 2013

PAINTING GAYLE'S MANTEL FROM PICKLED, WHITE WASHED OAK TO BLACK DISTRESSED

VISIT MY
LYNDA BERGMAN DIY BLOG
~
(UPDATE:  OMGoodness!!  I was working at Gayle's this morning and she told me that she had played golf yesterday and got a hole-in-one!!  Her golf friends were cheering and when she got home her husband had already started celebrating!! and had banners and stuff around congratulating her. WOW!  Congratulations, Gayle!!)  
     Gayle loves decorating her home.  A while back I painted those peach walls.  Her dining room is attached to this living room and has peach walls, also. I asked if we could paint her ceiling a peachy red to blend with the walls and she let me paint that, too.  I don't have photos of her dining room ceiling, but will take some next week because I'm working there again starting Monday.
     Her mantel in her living room was a pickled oak finish.  One of us mentioned the black and I knew it would look really good with all of her peach decor and her black rug and furniture.  (well, I just talked to Gayle and she said it was my idea to paint her mantel black.  She said I was there painting something else and I told her we just had to paint the mantel black! and she agreed and let me paint it and she just said that she loves the way it looks now.)
Doesn't this room look soooo cozy!!
Painting the mantel black made such a dramatic difference to the room.
First, I primed the mantel.  Then, I painted it with a black oil based paint and rubbed the edges with a rag so the brown base coat color would show through, thus looking a bit distressed.
Then, I sealed it with two coats of an oil based sealer.
I love the way this turned out and it looks so beautiful in her already beautiful living room.
This is Gayle's dining room ceiling.  The peachy red adds a nice touch to the dining room and ties in so nicely with the living room decor.
~
VISIT MY 

Thursday, January 24, 2013

FRENCH GREY HAND PAINTED DESK/TABLE

A little more than a year ago I designed and painted this desk/table.  I had most of the wood cut, my supplies and legs, and was going to build it myself.  Then I realized maybe I couldn't make it as strong and sturdy as my carpenter neighbor could.  So, I gave him the pieces and asked him to build it for me.


After my  neighbor did a great job of building this table, I painted it a french grey, painted a lighter french grey design, distressed and then aged it with an aging/antiquing glaze that I mixed.


For a while I had this table in a store, Gracious Living.  Kennie sold tons of my things, but this desk/table wasn't in there very long and Kennie closed her store.  So, it's been in storage and now I'm ready to sell it again.  I really love this desk/table, but don't have room for it in my house.


Here it is in Gracious Living.  Kennie put everything together so beautifully!


Since the french browny greys are so popular now, I think I'll paint some more things these colors.
Update:  I really love this table and couldn't bear to sell it, so I'm  now using it as my own desk.

Wednesday, January 23, 2013

REPAIRING A WALL BORDER WITH TEXTURE & PAINT

My client has Skin Rejuvenation Clinique, Broadway location.  She decided to open a "blow dry bar" and wanted it to connect to her existing business.  So, they had to make an opening between the two businesses.  For some reason, there was, already, a border painted on the wall where they cut the opening.  But, when they repaired around the new door frame, they couldn't help but float the wall, with sheetrock mud, onto the border.  Thus, destroying the faux finish.


The wall around the border was already fauxed a beigy color and there were definite lines around the existing border.  So, already being drawn, it was easy for me to follow the edge. 
I re-textured the border with a venetian plaster that I got at Lowes.


Then, I painted a base coat and let that dry.


Then, I added a darker color to age the new texture.  I brushed the paint on and then wiped it off with a rag.  The dark color stained the paint color and stayed in the crevices of the texture.
I love texturing and aging a wall!  But, this time, all I worked on was the border.


My client was out of town when I finished this border.  I'm thinking she'll be really happy because she loves things to look old and this border looks old!  And it matches, really well, with their floors and existing wood decor.
( This morning, I heard from Tina.  She emailed me and she was very happy with the wall...
                                                   "Great, love the wall it looks awesome."
                                                            I thought she would like it! )

Sunday, January 20, 2013

PAINTING ARTWORK FOR JUSTIN'S ROOM...A TREE & BIRDS, SQUIRRELS & A LIZARD

Justin was just a little boy, when his mom asked me to paint a tree on his wall.  He's big, now, and this wall has been repainted and artwork painted over, but I have these photos, these memories!!  I bet, when they see his little boy room, again, it will bring back sweet memories.


I love birds and seem to always want to put birds, somewhere in the scene.  It was a while back, but I think I painted these little blue birds, because they matched some of his bedding or some decor in his room.  Or, maybe, I painted the blue birds because he was a little boy.


These squirrels are having fun, playing up and down the tree and Justin said he wanted a lizard, too.
The chameleon is watching the squirrels play.


Back then, I did quite a bit of work in this beautiful home.  A mural in three bedrooms, painted the walls, painted a special finish on the kitchen cabinets. Lots of other work, too.
Thank you for the very nice memories!

Thursday, January 17, 2013

FROM BATH CABINET TO A HAND PAINTED ARTSY BIRD CABINET & TUTORIAL

FROM BATH CABINET TO A HAND PAINTED ARTSY BIRD CABINET & TUTORIAL

In the home where I was working my clients happened to be remodeling one of their bathrooms.  They were replacing their cabinets and put them in the garage to be hauled off.
One of the cabinets was a linen cabinet that hung over the commode.
When I saw it in the garage I just knew I could do something special with it.
I bet lots of you have this same cabinet over your commode with the opening on the bottom for tissues, towels, etc.  I asked a carpenter to help me with the feet.   
I asked him to turn it upside down with the opening at the top.  Then I found these feet at Lowes.  Actually, they are fence post finials.  I asked him to attach these feet to the cabinet.  The little wrought iron corner pieces I found at Hobby Lobby...LOVE their 40% off coupons!!
I added the new handles, too.
I started painting it.  I primed and painted it a soft blue.  I painted all of the artwork on front and sides.  Finally, I aged it with an antiquing glaze and sealed it with a clear coat.
I painted the inside an off white that matched the other artwork.  
I painted little metallic dots on the front of the shelves.
Painted metallic copper/bronze around the feet and a couple of other places on the cabinet.
I really loved how this cabinet turned out and it sold very quickly!  
One of these days I think I will get to see it again in a client's home.
I do hope so!!
Because I forgot to take a "before" photo of the original linen cabinet
I found this on Google to show you.  I wanted you to see what I started with.
You can do it, too!

Tuesday, January 15, 2013

HAND PAINTING ARTWORK ON FOUR GROIN CEILINGS FOR PATTI'S NEW HOME & TUTORIAL

HAND PAINTING ARTWORK ON FOUR GROIN CEILINGS FOR  PATTI'S NEW HOME & TUTORIAL

     When Patti was building her BEAUTIFUL! new home, I spent more than 3 months working there.  But, for about a year before that she was bringing me all sorts of things to paint for her new home.  She brought me tiles, furniture to be installed in baths, light fixtures, lots of different things, even her weathervane to go on top of her home. 
     This is the entry hall to Patti's very beautiful home.  There are four groin ceilings in a row surrounded by these amazing stone walls.  When she was building her new home she asked me to paint artwork on these four ceilings.  Using the same colors I painted a different pattern on each one. 
Aren't these light fixtures SPECTACULAR!!
The base coat on the ceilings was a light beigy brown.
The first thing I did was draw all of the scrollies and the center flower at the base of each light fixture.  Next, I used a small brush and painted everything.  Then, I used a tiny brush and a very dark blackie brown paint and outlined all of the artwork.  When I was finished with alllllll of the artwork I brushed on and wiped off with a rag a very light brown aging glaze.  The glaze was a really nice finishing touch.  It tied everything together and looked so good with her darkly stained pine wood floors and stone walls.
                 It was lots of hard work, but I'm very proud of how everything looks, now.
                 Patti has such great taste and it really shows in this wonderful home.
                                                              THANK YOU, PATTI!!

Saturday, January 12, 2013

REALLY CUTE TEENAGE GIRL's BATHROOM WITH MONKEY GIRL PORTRAITS

LOOK at this cute, cute bathroom for a teenager!!


About a year ago, I painted the cabinets in this bathroom to an aged, distressed finish.  The large mirror over the sink was crackled and my client wanted the cabinets to look, kind of, like that finish, but brown tones.


So, this time, my client asked me to come back and paint the chair molding, baseboards and medicine cabinet to match the base cabinet.


On the counter top, there is a very nice dark granite.  The doors and door frames, the bathtub and tile surround and the floor are white.  The walls are a browny, creamy beige. The colors and contrast of the colors look very, very nice together.


The dark tones that I added this time look so nice!  When I painted last year, she didn't have the monkey girl portraits and the dark tones look great with those colors.

Sunday, January 6, 2013

PAINTING A PICKLED WOOD STAIRWELL BANISTER TO LOOK LIKE STAINED WOOD

Lisa got new hardwood flooring and it is beautifully, richly dark.  The pickled wood banister on her stairwell didn't look right or go with the floors, anymore.


I had just worked for her next door neighbor, painting a special finish so their pickled wood bath cabinets would look like stained wood.  Lisa saw and loved the transformation and called me and asked if I could do the same process to her banister.


Yesterday, I finished her job and they are very happy with their new banister!  Lisa noticed my brush strokes and thought they looked like woodgrain.  
This special finish, has several layers and I had to be very careful with my brush strokes.  Because of the layers of primer and paint, you could no longer see the actual woodgrain.  I had to make sure that I brushed in the direction the grain would naturally flow and create new woodgrain.


As I completed the job, I painted two layers of clear sealer to protect the finish.  In some places, I painted a third coat, especially in the areas and posts that might be bumped a lot.
This is such a beautiful home and Lisa's idea to darken the banister was a really good one.  It, totally, changed the look of the entry into her lovely home.