HomeMi CasaTutorialsInteriors etcMurals and ArtworkPainted Furniture

Wednesday, November 10, 2021

PAINTING ANITA & GERALD'S RED BREAKFAST ROOM CHAIRS TO BLACK & METALLIC GOLD

PAINTING ANITA & GERALD'S RED BREAKFAST ROOM  CHAIRS TO BLACK & METALLIC GOLD

This is the breakfast room table I painted for Anita.
She asked me to paint it a metallic silver finish.
Her chairs were red and she liked the red, but thought she would be happy with them painted black since she was making a lot of changes in her decor colors.
So, I painted them black with metallic gold artwork.  I used a stencil for the design.
Painted black, they look sooooo beautiful with her metallic silver table.
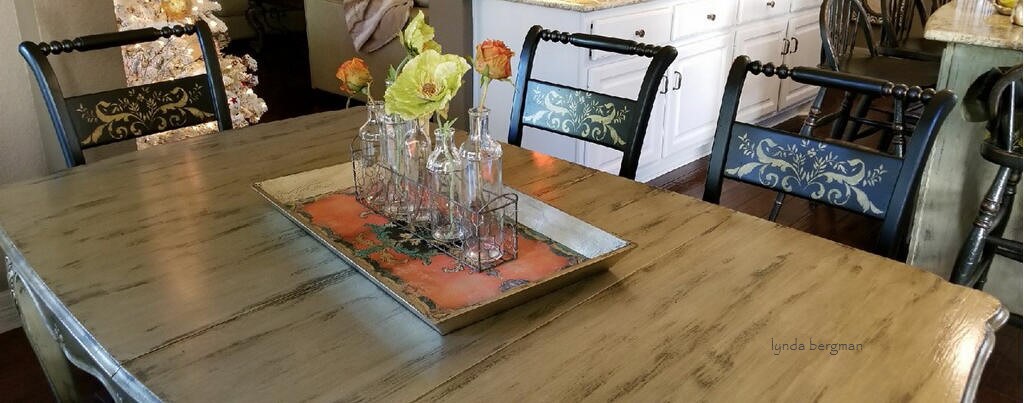
As I painted the table, I left those dark streaks.  That really ties in with the black chairs, too.
I love, love this picture!!  It's been hard for me to catch the silver "metallic" finish with my camera.  After Anita picked up the chairs and took them home, she sent these pictures to me.  You can see the "metallic" silver table and "metallic" gold on the chairs "reflecting" light.
On the chairs, I painted a hard finish black satin paint and sealed with a satin sealer.
They should hold up very well to the natural wear and tear of family use.
These colors are just wonderful with Anita's new breakfast decor.
The stencil I used looks like rooster feathers to match the chair cushions.
Painting chairs in my studio.
Anita's paint projects are almost completed.
 I'm really proud of the way everything has turned out.
"Before"
~
Here is a link to Anita's kitchen and paint projects during November & December:
PAINTING ANITA'S KITCHEN CABINETS
~
FOR HOME DECORATING PROJECTS & TUTORIALS
VISIT MY
LYNDA BERGMAN DIY BLOG
Original post on 12/11/17

Saturday, September 25, 2021

TEXAS BORDER PATROL USING HORSES AT THE BORDER IN DEL RIO, TEXAS ~ In response to the lies and misrepresentation in media

Andy Lewis
In response to the lies and misrepresentation in media, "Definitely the best job I ever had, you become one with your horse. They learn to trust you. They will go to the end of the earth, if you ask them. We train everyday with them. Definitely the best partner I have ever had. See what’s in my hands? Those are split reins; not whips, they are 6 feet long. They are split for when we go into the brush. If we go through thick brush and a tree branch gets caught, it will just slip right through. The reins are connected to the bit. The bit is in their mouth and the last thing we want to do is hurt our partners by tearing up their mouths.
You have seen the video of the agent spinning the rein when noncitizens get close to the horse. It’s to create distance between the horse and the person on the ground. Our horses easily weigh 1200 pounds, they can step on someone and break a bone or kill a small child of a person gets to close. We also spin them if someone attempts to grab the reins because the last thing you want is someone who doesn’t know a thing about horses, to have control of the horse you are on. (If noncitizens attempt to gain control of our reins it is considered deadly.) The horse can freak out, jump up and roll with you on them. Us as riders can be killed if a horse lands on us. Hope this helps those who have never seen a horse or split reins before… we will continue to support our brothers and sisters in Del Río." - Deanndra Cantu - one of my fellow Border Patrol Agents 💯

Friday, September 24, 2021

HAND PAINTING A RECIPE BOX TO MATCH A WEDDING INVITATION FOR FAMILY RECIPES ~ GIFT

 Kara is going to a family wedding.  In this picture, on the left, is the invitation to the wedding.  Kara brought a little recipe box to me and asked if I could hand paint the same kind of flowers on the front of the box.  They wanted to share family recipes with the new bride and put them in this little box as a gift.  Kara copied the invitation, cut out flowers and taped them together to show me how she wanted the flowers placed on the recipe box. 

(Did you notice on the invitation where the wedding is going to be?)

I painted the flowers and sealed with a clear sealer. Getting started.Thank you, Kara.

Saturday, August 7, 2021

"FOLLOW BY EMAIL" IS CHANGING


      "Follow By Email" with Feedburner is changing and going away sometime this month.  I can save the followers and re-install them so you can continue to receive this blog's emails.  I'm trying to figure out how to do just that.  If you get deleted, please check back to see if I have a new way to "follow by email".  I do appreciate you!  Lynda   

Friday, July 30, 2021

PAINTING TROMPE L'OEIL CRACKS ON A WALL & TUTORIAL

     Today, I finished a job at Tina's house and got to take some photos of past projects that I did at her house.  She does like old and old world decorating.  A while back she asked me to paint trompe l'oeil cracks on her patio walls.


It's a little too cold right now, so you don't see all of her beautiful flowers and greenery on her patio.  But, a few months ago when I painted these cracks it looked really, really nice to see the plants in the background.


TUTORIAL

It's not hard to paint cracks and crevices.  I used a dark raw umber and a little bit of black and a very small brush.  It's best to start with a small brush because you can always smudge a little wider and a little more narrow.  You start where you think cracks would be naturally.  I didn't use a pencil, but it might help if you use a pencil first so you could see where you're going with your brush.  At the end I gently smudged around close to the cracks so they would look a little bit dirty and smudgy.  After a while with the natural elements they will start looking even more natural.  And, they might look a little better and more authentic from a distance.
Have fun!
(Original Post 3/3/13)

Monday, July 12, 2021

PAINTING FAUX FINISHES ON IRENE'S DINING ROOM WALLS & CEILING & CRACKLED DISTRESSED FINISH ON HER KITCHEN CABINETS

PAINTING FAUX FINISHES ON IRENE'S DINING ROOM WALLS & CEILING & CRACKLED DISTRESSED FINISH ON HER KITCHEN CABINETS

Irene's home is so elegant!
Through the years she has asked me to paint special finishes in several of her rooms.
This is her dining room.
I painted her ceiling medallion to coordinate with her fabrics and the finish I painted on her ceiling.
I painted her ceiling a very dark brown and hand painted metallic gold over the whole surface.  I painted the gold in swirls, just swirling my paint brush.
Remember, you have to have light for the metallic paints to reflect.
This is the finish I painted on her dining room walls. I painted the walls a metallic gold, then crackled a very soft green over the gold.  Last, I glazed with an antiquing glaze.  Notice that I painted the chair rail  and switch plate so they wouldn't be so noticeable.
I painted the crown molding the same dark brown as the ceiling.  Then, I painted a solid coat of the metallic gold, leaving little brown streaks.
If I paint a special finish on a ceiling I always paint over the a/c vent, too.  Sometimes I paint the whole thing and sometimes I just paint the outer edges and not the little louvres.  
This is the crackled distressed finish I painted on her kitchen cabinets.
I used a stencil and metallic gold for the design.  
Then, I painted an aging glaze and sealed with a clear sealer.
This is one of my favorite kitchens that I've painted.  
I think the cabinets are so beautiful and really fit in with her other decor.   
Her kitchen island has the same finish as the other cabinets.
There is a wet bar between the large kitchen area and the dining room.  
I painted the same finish on those cabinets.  The upper cabinet doors have a decorative clear glass and you can see her beautiful crystal glasses.
I'm very proud of my work, here.
Irene, thank you for letting me be a small part of your lovely home!  
  Original Post 
July 12, 2015

Sunday, March 21, 2021

FUN WITH EGGSHELLS

                                                                           Pinterest
 

Thursday, March 4, 2021

HAND PAINTING A CHANDELIER & HIDING METALLIC GOLD WITH A BLACK GLAZE ON A CABINET

 My friend just moved into a beautiful new home.  While arranging her furniture this cabinet fit perfectly in this spot.  There was some metallic gold on it and she wanted to change the metallic gold to black.  See those vertical decorative insets and feet?  There are four.  Two in front and one on either side in the very back.  I used a black glaze, painted over all four and sealed them with a clear sealer.  You can see some of the gold coming through the black, but it looks like a faux finish.  There were some tiny chips here and there on the cabinet and I used craft paint to touch up and cover the chips.  I think I used Americana Soft Black.  It was beautiful with the metallic gold, but now it looks really, really nice with the black.  Oh, and they will be changing out the handles.  If I get a picture of the new handles I will post and show you. My friend's very large chandelier in the dining room was really bright and shiny with metallic silver paint.  She preferred that it be toned down, so I used the same black glaze to soften the shiny silver.  I've painted many a light fixture and chandelier.  You have to paint every single arm on all four sides, every leaf and every single decorative piece.  It took hours to do that, standing on a ladder.  I painted on and wiped off with a rag.  Toned down the acanthus leaves with a yellow gold craft paint.  Painted on and wiped off.  When the lights are on you can see some metallic silver shining through and it looks really pretty.

I loved getting to see her beautiful new home.

Friday, February 5, 2021

PAINTING ANTIQUE GATES FOR ROBIN & JAVI'S BEAUTIFUL HOME


Robin and Javi were building a new home.  While it was being built Robin was busy looking for old doors and other antique items.  She found these old gates.  They looked really good, but had been painted with what I think was interior paint.  Most interior paints will not hold up for very long outside in the sun and weather.  So, after two years that paint was looking really flaky.  (Above is the new paint.)

This is the new coat of paint.  In time, these gates will fade a little bit and look even better.

Their new home is really beautiful.  Robin does all of her decorating and I'm sure she helped design her new home.

When I paint I get really messy hands.  Often, I wipe paint off with my hands instead of a rag.
This picture is "before".
Those bars are metal.  I lightly swiped paint on them.  The rust will come back through the paint. 
Also, I only swiped a little bit of paint on all of the metal latches.
 Robin wanted them to look old and rust does look old.
I love these old gates.
First, I scraped off as much of the flaky paint as I could.  I left the rest of the old paint on for the texture and I knew it would show through the new paint as I wiped it off. 
 I used exterior flat paint.  I painted a little on and immediately rubbed it off with a rag.  And, kept doing that until all was painted.