HomeMi CasaTutorialsInteriors etcMurals and ArtworkPainted Furniture

Monday, December 28, 2015

BUILDING A JEWELRY DISPLAY SCREEN & SEWING A CANVAS CARRYING BAG FOR ELIZABETH'S CRAFT SHOWS & TUTORIAL

BUILDING A JEWELRY DISPLAY SCREEN & SEWING A CANVAS CARRYING BAG FOR ELIZABETH'S CRAFT SHOWS & TUTORIAL

Elizabeth loves to make jewelry.  She goes to different craft shows, like Southtown,
where artists display their art and crafts for sale.
She mentioned she was working on her jewelry displays and needed a bigger table, etc.  So, for Christmas, I surprised her with a larger display and canvas bag just the right size to carry it.
For strength and to be able to add more nail hangers on the frame, I made it out of 1"x2" trim pieces.  I made two frames and nailed the chicken wire between the two frames. 
 Lightly sanded all of the edges and corners for a softer, more rounded look.
I added a handle on top for easier carrying.  Then, I spray painted it black.  I suggested she use Christmas ornament hooks to hang her jewelry.  She'll figure that out.
After the frame was finished, I knew the measurements for her canvas carrying bag. 
 I always have lots of canvas cloth on hand.  Before I measured and cut the fabric, I washed and dried to "size" it. That way, she can wash it in the future without it shrinking.  
Then, I sewed the bag.  Made french seams to prevent fraying. 
I wanted her name to be in my handwriting.  So, I wrote her name on a piece of paper.  Used graphite paper to trace it onto her canvas bag.  Then, I used black craft paint to paint it.  Used textile medium to thin the paint a little and to make sure it soaked into the fabric.
Put the bag in the dryer, wrong side out, for about 10 minutes to "set" the paint.
I want to be a carpenter!
I have tools and saws and everything I really need.  But, when I build something it never turns out perfectly like a real carpenter's work.  Once I paint, it covers up a lot of my imperfections.  Even when things are not perfect, I think of  Ralph Waldo Emerson's
"The only gift is a portion of thyself"
So, that makes me feel better.
Elizabeth was surprised, happy and thrilled with her gift.
Me, too!
After Christmas sales, she's a little low on merchandise, but here is link to her ETSY SHOP:

Friday, December 25, 2015

TRANS-SIBERIAN ORCHESTRA ~ CHRISTMAS CANON

TRANS-SIBERIAN ORCHESTRA ~ CHRISTMAS CANON

"This night we pray
Our lives will show
This dream He had
Each child still knows"

Tuesday, December 15, 2015

HAND PAINTING STRIPES & A PLAYHOUSE, PICKET FENCE & FLOWERS IN A LITTLE GIRL'S ROOM

HAND PAINTING STRIPES & A PLAYHOUSE, PICKET FENCE & FLOWERS IN A LITTLE GIRL'S ROOM

One time a family was moving into a new home.
The little girl's room was blue and the mom asked me to paint stripes for her.
I drew and hand painted the yellow stripes and green ivy as a border.
Then, I asked if I could paint her a playhouse.  
So, I drew and painted the outline of a playhouse.  Then, I painted the picket fence and flowers.
They placed a little table and chairs in the corner with the playhouse.
The little girl just loved it and her mom said she played near it all the time.
That was a fun project!
~
I found this picture in a stack of pictures of my work and thought it would be great to share it with you just before Christmas, in case it might give you some ideas for a little girl or boy's room.  The playhouse can be any color.  Maybe it could be brown and they could play like it's a fort or a cabin.
Or, draw the outline of a spaceship. 
 I bet they would really love that!!

Friday, December 11, 2015

PAINTING & GLAZING DEBBIE'S NEW ENTERTAINMENT CENTER CABINET

PAINTING & GLAZING DEBBIE'S NEW ENTERTAINMENT CENTER CABINET

Debbie's entertainment center is in her great room.  She had been wanting to change it and make it nicer because you can see it from nearly everywhere on her, very open, first floor.
 So, she designed and told the contractor what she wanted.  
She wanted it more open and she wanted a great big arch above it.
She designed this cabinet for her collection of beautiful pieces of art and asked me to paint it for her.
I used an oil based semi-gloss off white paint for the base coat.  Then, I used a dark stain and brushed on and wiped off, leaving stain in the crevices and streaked it on the flat surfaces.
This small cabinet and shelves were next to the new cabinet and I painted it to match.  The mantel is soft off white stone and my colors tied in really well.
This is Debbie's wonderful Nickie.  He's so friendly.  A while back when I was painting her bedroom, Nickie kept getting on my ladder and I had to call his mommy to get him down so I could paint.  It was funny.
And, little Issy and Bella.  Issy is the little sister.  So cute!!  Sweet Bella is older and blind.  I always think Debbie is so sweet to her.  She knows her way around the house.
This is a view of the cabinets and fireplace.  Before, Debbie thought it didn't look right, maybe cluttered.  Now, with her new design and paint she's very happy.
I love how Debbie decorates her home.  It's so comfortable, yet elegant.
Thank you Debbie!  I always love working with you.

Saturday, December 5, 2015

PAINTING HUGE, BEAUTIFUL ART & MIRROR FRAMES FOR SAUNDRA'S NEW HOME

PAINTING HUGE, BEAUTIFUL ART & MIRROR FRAMES FOR SAUNDRA'S NEW HOME

Saundra is building a new home.  
These picture frames and mirror frame were truly beautiful.  The problem was, they were all bright metallic gold.  They looked wonderful in her home that she just sold, but she felt the bright gold would not go as well in her new home.
 She asked me to age them and make them darker.
The mirror is over 6' tall.
This painting is almost that tall and a few inches taller and I am.
This one is very wide and tall.
I used my dining room table as a work surface.
See where I had already started aging on the left side.  The right side is the original bright gold.
Darkening the frame made this painting even more beautiful.
She asked me to paint the off white 1" fabric mats on both paintings.  That really made the colors in the paintings look better, too.  This one, I painted dark brown and dry brushed metallic gold on it.
See the bright gold and the darker where I aged it?
And, see that little flat strip in the middle of the frame?  As I painted it, I dabbed my brush on it to make it look more textured.  You can see it better, two pictures above this one.
This one was bright gold, too. 
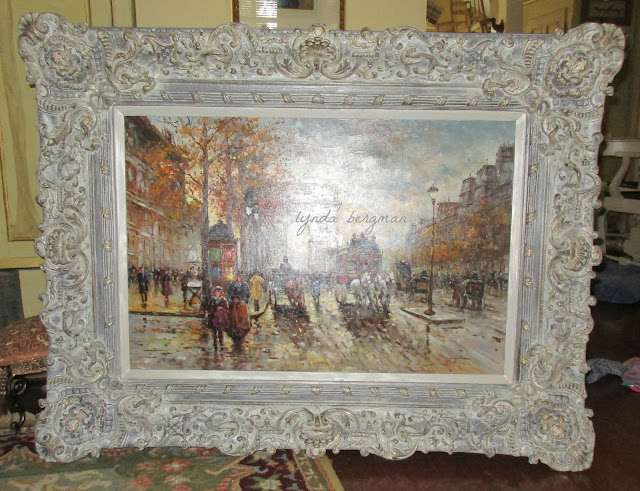
 Saundra chose a gray distressed finish.
I rubbed the paint to make only a few gold highlights come through the gray.
Then, she and her husband decided they wanted more warmth and depth, so I worked on it to bring more brown and gold through the gray.  
They are putting this painting on the stones over their fireplace and it will have a spotlight on 
it.  They want to make sure it shows up well on the color of stones they chose.
This is the original metallic gold I started with.  
To get this finish, I started with a dark brown under coat.
After I worked on it a while, this is how it looks now.
After I painted this little 1" mat a soft gray white, Saundra asked me to dry brush some metallic silver on it.  Oh my!!  it is really beautiful!
We are all amazed at how different and beautiful the paintings and mirror look, now.
Painting your frames and mats really can make a difference in your decor.
I might be painting some powder room cabinets in her new home and 
I can hardly wait to see what she has created this time.
Thank you, Saundra.