HomeMi CasaTutorialsInteriors etcMurals and ArtworkPainted Furniture

Showing posts with label kitchens cabinets etc..... Show all posts

Sunday, September 15, 2024

PAINTING CABINETS WITH GEL STAIN & A REMODEL OF RUEBEN'S MASTER BATH

PAINTNG CABINETS WITH GEL STAIN & A REMODEL OF RUEBEN'S MASTER BATH

A few years ago, Carrie and Rueben asked me to paint their pickled oak wood guest bath and powder room cabinets to a darker stained finish.  Rueben liked the finish so much that he asked me to do the same technique on his cabinets in his master bath.  Recently, he was remodeling his master bath with new tile, flooring, glass shower enclosure and new granite counter tops.  He thought the stained cabinets would be the finishing touch to his new decor.
All of the colors blend so well and look so nice.  Everything looks "finer", now.
The large mirror did not have a frame, so he had someone make one.  All of that mitering is not easy.  At least, not easy for me!
New frame pieces.  Look at that mitering job.
I can't get over how well the miters match.
Picture of pickled oak cabinets "before".  And, new mirror frame.
I used a gel stain for the cabinet finish.
Gel stains can be used on an already painted or sealed surface.
Thank you, Rueben.
Original Post 9/10/2019

Sunday, July 28, 2024

HAND PAINTED RED KITCHEN CABINETS WITH A DISTRESSED, AGED TECHNIQUE/FINISH

      HAND PAINTED RED KITCHEN CABINETS WITH A DISTRESSED, AGED TECHNIQUE/FINISH

When my client moved to a new home she asked me to paint her cabinets in her HUGE new kitchen.  Her husband loved red!  Their sofa was red and they had quite a few red accents.  So, I suggested she let me paint the kitchen cabinets red.  I knew it would look soooo good in this new house with all the wall colors, her furniture and decor.  She just could not see the red and brought in a decorator and a builder and got their opinions.  I don't remember exactly, but I'm sure they weren't in favor of the idea of a huge red kitchen, because I had to keep begging!!!  Her husband liked the idea of the red kitchen, so my client finally, reluctantly, said ok.
When I paint a distressed technique on cabinets or furniture it is always with several layers of paint.  I painted these cabinets red.  Then I distressed and sanded the paint so the brown wood would show through.  Applied and wiped off a dark stain.  Last, I sealed with two coats of clear sealer.
My client had seen my faux "antique copper" finish, so she asked me to paint her vent hood.  I did a lot of embossing with a stencil around the border and in the middle of the top.  Then, applied the "antique copper" finish.  I painted metallic copper and glazed with a dark glaze.  Last, I painted the embossed design with a tiny brush and metallic gold paint.
Her wet bar was attached to the kitchen, so she wanted the same red, distressed finish on these cabinets, too.   This was a very large kitchen and wet bar with lots of cabinets.
Well, I think I was right to keep insisting on the red kitchen.
She and her husband absolutely LOVE it!!
They entertain a lot and she told me that everybody who sees her red kitchen loves it, too.  She feels good that it is unique.  And, she knows that no one has a kitchen like her's!
This is a ceiling medallion she asked me to paint for her new living room.  They were hanging a new chandelier on the very high ceiling and wanted the medallion painted red. 
Of course, it looked great, too!! 
She has great taste and I loved working with her and her husband.
Are you brave enough to do this??  Paint your kitchen red?
You just might love it, too!
Original post 10/4/2012

Thursday, June 27, 2024

PAINTING ANITA & GERALD'S RED BREAKFAST ROOM CHAIRS TO BLACK & METALLIC GOLD

PAINTING ANITA & GERALD'S RED BREAKFAST ROOM  CHAIRS TO BLACK & METALLIC GOLD

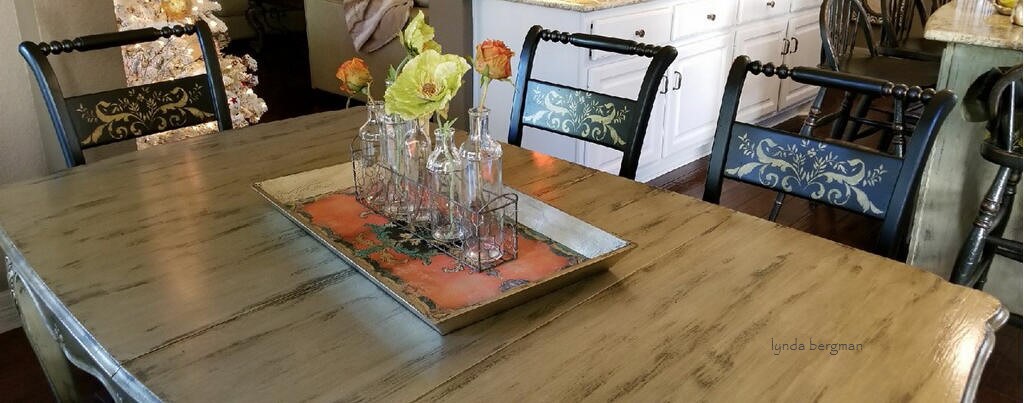
This is the breakfast room table I painted for Anita.
She asked me to paint it a metallic silver finish.
Her chairs were red and she liked the red, but thought she would be happy with them painted  black since she was making a lot of changes in her decor colors.
So, I painted them black with metallic gold artwork.  I used a stencil for the design.
Painted black they look sooooo beautiful with her metallic silver table.
As I painted the table I left those dark streaks.  That really ties in with the black chairs, too.
I love, love this picture!!  It's been hard for me to catch the silver "metallic" finish with my camera.  After Anita picked up the chairs and took them home she sent these pictures to me.  You can see the "metallic" silver table and "metallic" gold on the chairs "reflecting" light.
On the chairs I painted a hard finish black satin paint and sealed with a satin sealer.
They should hold up very well to the natural wear and tear of family use.
These colors are just wonderful with Anita's new breakfast decor.
The stencil I used looks like rooster feathers to match the chair cushions.
Painting chairs in my studio.
Anita's paint projects are almost completed.
I'm really proud of the way everything has turned out.
"Before"
~
Here is a link to Anita's kitchen and paint projects during November & December:
PAINTING ANITA'S KITCHEN CABINETS
~
FOR HOME DECORATING PROJECTS & TUTORIALS
VISIT MY
LYNDA BERGMAN DIY BLOG
Original post on 12/11/17

Friday, May 17, 2024

AN EXCITING NEW & MODERN LAUNDRY ROOM FOR MY CLIENT ~ PAINTING & REMODELING

AN EXCITING NEW & MODERN LAUNDRY ROOM FOR MY CLIENT ~ PAINTING & REMODELING

My client wanted to remodel her laundry room.  She asked me to paint her cabinets, walls and ceiling.  The darker color in this picture is the actual color I painted on the cabinets.  The light from the window is playing tricks with the new paint colors.
She added new granite counter tops and flooring.  A newly built cabinet is on the left of this picture by the sink.  It goes all the way to the ceiling.  To make the cabinets look consistent, she had her carpenter add new panels above the existing cabinets.  (picture below) 
The overall look is so nice, now.  One of my favorite things is the new enclosure and granite top added over her washer and dryer.  Before, the washer and dryer were free standing.  Her carpenter building and adding this enclosure gives my client more flat surface for folding clothes, etc.  
These two are new cabinets.  I think they were just doors and cabinet, before.  These new enclosures are room for tall clothes hampers.
New tile flooring.  I love her new floor!
New light fixture with a fan in it.  
On the left is the newly built cabinet that goes all the way to the ceiling.
This pictures shows you the new panels the carpenter built and installed so the cabinets would be consistently tall to the ceiling.  It makes the whole room look better.
Me painting the new upper panels and trim.
I forgot to take a picture of "before".  This is a wonderful laundry room re-do with lots more cabinet/storage space and it is really beautifully decorated.
Original post was on 9/9/2019.

Tuesday, April 2, 2024

BLACK DISTRESSED PAINT SAMPLES FOR A KITCHEN ISLAND

BLACK DISTRESSED PAINT SAMPLES FOR A KITCHEN ISLAND

A designer/contractor has asked me to bid on painting a kitchen island.  The other kitchen cabinets are a really nice medium brown stained.  They are thinking they want a black distressed finish on the island.  So, I made these samples for approval.
Paint black and rub the edges with a rag.
I love the middle one.  I think the bottom one is the designer's choice.
Black is such a good accent color in almost any room.  
And, as always I love old distressed finishes.
When I was in the really beautiful home, they were also talking about removing a high wall and leaving a load bearing beam exposed.  They wanted the family room and kitchen to be open to each other.  I might be faux painting that beam to look like some kind of wood.  We'll see what happens and of course I'll share the final results with you.  It might be a while, though.
I really like my job!!
Original post 10/18/14.

Sunday, January 21, 2024

PAINTING A 1930'S TELEPHONE TABLE TO A FRENCH COUNTRY CREAMY CRACKLED DISTRESSED FINISH

PAINTING A 1930'S TELEPHONE TABLE TO A FRENCH COUNTRY CREAMY CRACKLED DISTRESSED FINISH

Recently I painted kitchen cabinets to a french country crackled distressed finish.
The colors were so creamy and soft.  
I wanted to paint a piece of furniture with similar colors and technique.
A while back I found this 1930's telephone table and decided it would be perfect!
In case you weren't around back then, that open space was for a telephone book.  The phone sat on top of the table and had a permanent wire coming from the wall.
  You couldn't move the phone around the house like you can today.
I stenciled the top with a soft glaze and painted parts of the legs in the same glaze.
When I found this table, the handle was missing.  In my studio stash I found this knob with a backplate and it was just the perfect size to cover the original holes. 
 I drilled a new hole in the middle for the new knob.
It would have been nice to have the original handle, but really like this one.
I am very happy with the way this antique table looks now.
Original post on October 22, 2016.

Sunday, July 16, 2023

USING A DARK GEL STAIN ON LORI'S FAMILY ROOM CABINETS

USING A DARK GEL STAIN ON LORI'S FAMILY ROOM CABINETS

In Lori's home all of the cabinets use to have a pickled, white washed finish.
 She asked me to paint some of her cabinets black/distressed.  The black looks amazing with her wood floors and decor.  Then, she asked me to darken her kitchen cabinets just a little bit so they would look distressed.  I used a gel stain on the edges and a little in the middle of the doors. 
The gel stain really toned down the pickled finish.
Recently, she called and wanted me to use gel stain on her family room cabinets.
Even though the cabinets were pickled, white washed, the wood was a little different and the wood soaked up more of the gel stain than in the kitchen.
 I painted on and wiped off with a rag. 
 It looked really, really nice with the brick on the fireplace.  
She is especially happy with the way the new color looks on the mantel.
There are so many different ways to use a gel stain.
This turned out to be a really good one.
Lori is very happy with the final result of her family room cabinets.
(Original post 12/26/16)

Sunday, July 10, 2022

BACK AT JACKIE'S AGAIN, PAINTING DRAMATIC CHANGES TO HER CHAIRS, REFRIGERATOR & VENT-A-HOOD IN HER BEAUTIFUL TUSCAN KITCHEN

About three years ago Jackie asked me to paint a special finish on her kitchen cabinets.
We decided on a tuscan special finish.
Since then her kitchen has remained one of the most viewed and most popular posts on my blog.
Here is a link to that post:
JACKIE'S TUSCAN KITCHEN
Back then she knew she wanted to change out her table and chairs because they were a cherry wood finish and the red color just did not look right to her in her new kitchen.
She wanted a copper table and finally found one a couple of months ago.
She asked me to paint those red cherry wood chairs because the size was great with her new table.


Jackie wanted them black and her husband liked the finish on the kitchen island that I painted, so we decided on swiping metallic gold on the back spindles. of the chairs.


While I was there painting the chairs she asked if I could paint the stainless steel vent-a-hood a metallic copper, similar to the heavily patinaed (is that a word?) copper table.
So this is how I painted her vent-a-hood.
Remember metallics reflect, so when the light is hitting it just right it does have a metallic sheen to it.


Jackie was in the mood to change everything stainless to black and copper and asked if I could paint her stainless steel refrigerator black.  Yep! I could do that!!
So, here is her newly painted black refrigerator.
It was only three years old and she didn't want to purchase a new black one.


This is their new rescue cat, Julius.
Her daughter got him as a rescue cat and thought he looked like an orange julius.
He's a really sweet cat!
And, he kept an eye on me to make sure I was doing exactly what mom wanted.


This is her beautiful new copper and wrought iron table.
The metallic copper reflects, just not in this photo.
  

Here are the chairs, refrigerator and vent-a-hood "before" I painted them copper and black.
I didn't think Jackie's kitchen could get any more beautiful.  Here it is, though.
She was right! 
Everything really does look better now.
Thank you, Jackie, for giving me something beautiful to do, again!
(Oh, and she replaced her stainless steel oven and microwave oven to black.  The sizes were different, so I have to go back and make the exposed wood around them match the cabinet finish.  So, I will get to take more pictures in a couple of weeks and will share them with you.
I love getting to see everything put back together.
(Original post was published on 8/1/2014.)

Monday, July 12, 2021

PAINTING FAUX FINISHES ON IRENE'S DINING ROOM WALLS & CEILING & CRACKLED DISTRESSED FINISH ON HER KITCHEN CABINETS

PAINTING FAUX FINISHES ON IRENE'S DINING ROOM WALLS & CEILING & CRACKLED DISTRESSED FINISH ON HER KITCHEN CABINETS

Irene's home is so elegant!
Through the years she has asked me to paint special finishes in several of her rooms.
This is her dining room.
I painted her ceiling medallion to coordinate with her fabrics and the finish I painted on her ceiling.
I painted her ceiling a very dark brown and hand painted metallic gold over the whole surface.  I painted the gold in swirls, just swirling my paint brush.
Remember, you have to have light for the metallic paints to reflect.
This is the finish I painted on her dining room walls. I painted the walls a metallic gold, then crackled a very soft green over the gold.  Last, I glazed with an antiquing glaze.  Notice that I painted the chair rail  and switch plate so they wouldn't be so noticeable.
I painted the crown molding the same dark brown as the ceiling.  Then, I painted a solid coat of the metallic gold, leaving little brown streaks.
If I paint a special finish on a ceiling I always paint over the a/c vent, too.  Sometimes I paint the whole thing and sometimes I just paint the outer edges and not the little louvres.  
This is the crackled distressed finish I painted on her kitchen cabinets.
I used a stencil and metallic gold for the design.  
Then, I painted an aging glaze and sealed with a clear sealer.
This is one of my favorite kitchens that I've painted.  
I think the cabinets are so beautiful and really fit in with her other decor.   
Her kitchen island has the same finish as the other cabinets.
There is a wet bar between the large kitchen area and the dining room.  
I painted the same finish on those cabinets.  The upper cabinet doors have a decorative clear glass and you can see her beautiful crystal glasses.
I'm very proud of my work, here.
Irene, thank you for letting me be a small part of your lovely home!  
  Original Post 
July 12, 2015