HomeMi CasaTutorialsInteriors etcMurals and ArtworkPainted Furniture

Saturday, November 25, 2023

HAND PAINTING ART ON RUSTY OLD CEILING TINS

     Ruth found these rusty old ceiling tins and asked me to paint something on them.  The design on the tins was so beautiful and I could see an urn with flowers.  Ruth had just built her country home and gave me the colors she was using in her master bedroom.  She wanted to hang these above her bed.  I love working with ceiling tins.  I have some that are so rusty, the rust has eaten holes in them.  But, they're still very beautiful!
To paint these, I didn't prime them.  I just painted a flat off white wall paint right over the rust, hoping that some of it might bleed back through.  
Only a little bit did and  it added to the aged look.  
She was very happy.  Me, too!

Original Post 
June 15, 2012

Wednesday, November 1, 2023

PAINTING FLOWERS ON AN OLD DRESSER TO MATCH A DECORATIVE MIRROR

PAINTING FLOWERS ON AN OLD DRESSER TO MATCH A DECORATIVE MIRROR

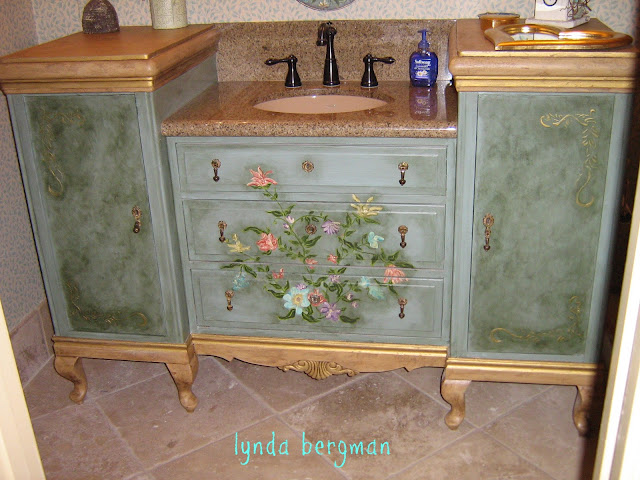
 I LOVE the way Patti decorates!!  This is one of her bathrooms...
She found this metal mirror and it was already beautifully painted.
Then, she found this old dresser and it was white and distressed.  She brought the dresser and the mirror to me and asked me to paint the dresser to match the mirror.
It was a bit of a challenge and fun to try to match the mirror.  I loved the flower colors and the aqua background color together.
I embossed the corners of these dresser doors with a scrollie design and then painted them and other tiny trim a metallic gold.  She had the dresser installed and then added the granite top, sink and faucet.
See why I love the way Patti decorates!!
Original Post 11/1/12

Wednesday, October 18, 2023

PAINTING A TROMPE L'OEIL WINDOW & PAINTING STONES TUTORIAL

PAINTNG A TROMPE L'OEIL WINDOW & PAINTING STONES TUTORIAL

My client had just moved into her new home.  She had a huge, oddly shaped niche in her family room that I guess was for a large television.  But, she didn't want her television there.  She wanted it across the room and asked me if I could paint the niche to look like a window. Also, she wanted me to faux paint her walls in her big open family room and kitchen/breakfast room area.
I can't find my pictures of "before".  
She wanted me to paint her walls a Tuscan gold color and I ragged a tea stain glaze over that color. It was subtle, but a very nice look. 
My camera flash made everything look brighter and more colorful than it actually was.
The niche was the color of the walls.  
I drew and painted the stones and then started on the sky mural.
I really love painting flowers and birds.
TUTORIAL
For the stones, I faux painted the walls the colors I wanted the stones to be.  Then, I used a level and drew the lines the size I wanted the stones to be.  I used a pencil for drawing the lines.  Then, with a small brush I painted squiggly lines on the pencil lines to define the mortar lines of the stones.  
I wanted the stones to look mossy and aged.
This is the way it looked from across the room. Not leaning, of course.  When I took these pictures, I didn't know I was going to have a blog and would need better pictures! 
My client was very happy with her new trompe l'oeil window.
As you walk in the front door it is in front of you across the room.
It looked like it really could be a window!
Original Post:  10/17/13

Saturday, October 7, 2023

REPAIRING DAMAGED ORNATE PICTURE FRAMES

REPAIRING DAMAGED ORNATE PICTURE FRAMES

 My client asked me to repair these large (22"x26") picture frames. I repaired the chipped and broken areas with wood glue.  When that dried, I textured over those areas with venitian plaster.  It dries to a hard finish.  I keep a can of the plaster in my studio for all kinds of repairs.  Now, I will paint the frames and you'll never be able to tell they didn't come from the factory with this textured finish on them.  My client wanted me to paint these frames a very dark brown to match his decor.  You can paint your frames with metallic paint or any paint and any color you want.
Good as new!!
This is a repost previously published on 12/30/11.

Sunday, September 24, 2023

DRAWING & PAINTING FAUX BRICKS (TROMPE L'OEIL) & TUTORIAL

     Back to the New Orleans style house where I've been working.
    The builder had one area that bothered him and couldn't decide what to do with it.
Finally, he had an idea and called me to ask if I could paint faux bricks for him in this area.
So, I did paint faux/trompe l'oeil bricks for him.  
Above are three walls with bricks.  
Can you tell which two walls are real and the one that I painted?
Ok, which one?
Alright, I'm sure you've guessed it.  The butler's pantry was very plain and the builder wanted me to paint the faux bricks to blend with the other two walls.  When you're standing in certain areas in the big living room you can see all three brick walls at the same time.  
It was important to make them look the same.
I'm very happy with the way they turned out.  
Everybody was saying, "oh, that looks good, you did it" and that made me feel good.  
The builder helped me with critiquing the grout lines and together, 
WE DID IT!!

TUTORIAL

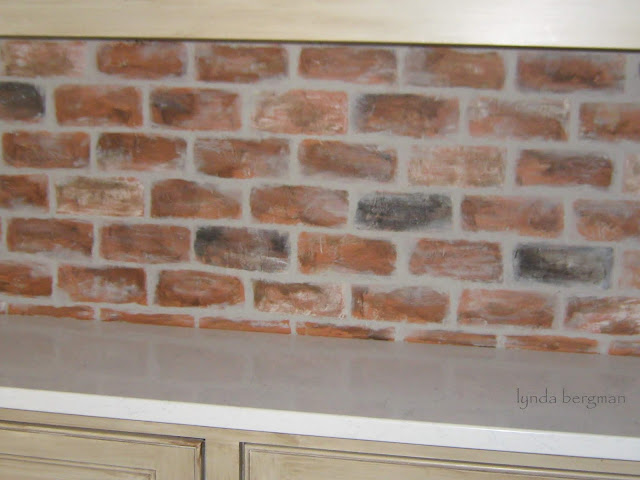
First, I used dry spackling.  With a broad knife and my finger I lightly textured the area.
 I picked out colors to match the existing brick and mortar colors.
 I painted the grayish grout color over the whole area as my base coat.
When that dried, I used my brick stencil to get the structure going. 
 Next, I used a regular brush to stencil the orange brick.  
Then, I used a brush to paint on and a rag to rub out raw umber, off white and black.  It took a while to work on each brick and make them different from each other.  Last, I went back with a brush to paint the grout lines a little wider.  As the paint was wet, I wiped with a rag and smudged areas onto each brick to match the existing real brick walls.
At the very bottom and at the very top I had to make my own bricks because the stencil wouldn't fit in those spots.  The bricks are so uneven it's very simple to do.  In the corners I lightly brushed some raw umber so it shadowed, making it look more three dimensional.
I think anyone could do this.  
You could paint the wall behind your fireplace, the backsplash under your kitchen cabinets, a mud room, a bedroom wall or any place you wish you had bricks. 
 You can use any color for your bricks and mortar.
Have fun!!
Original Post:  6/20/13

Friday, September 22, 2023

FAUX PAINTING CEILING BEAMS TO LOOK LIKE DARK OLD WOOD

FAUX PAINTING CEILING BEAMS TO LOOK LIKE

 DARK OLD WOOD

The beams in this great room were just boards and stained a medium brown.
Also, they had a shiny clear coat of sealer on them.
My client wanted them to look old and asked me to paint them to look like dark old beams.
I primed, then painted the base coat.
Then, I streaked a lighter brown and gray with my brush and a rag.
Last, I painted knot holes to make the beams look a little more authentic.
Because I wanted them to look old and dry I didn't paint a sealer on them. 
A clear coat sealer would have made them shine.  
A low sheen sealer would have made them shine a little bit and that, to me, does not look old.
It was a lot of work to paint these beams.  
Especially since I was painting for so many hours above  my head.  
The new darker beams were a dramatic change for this beautiful room.
This room was dark and the beams really did look like they might have been old wood.
My clients were very happy with their new old beams.
Oh, and I textured, painted and glazed these walls to look like old broken plaster.
And, I painted the ceiling the base coat color that I used on the walls under the glaze.
Original post was 9/30/14.

Wednesday, September 13, 2023

HAND PAINTING A CHANDELIER & TUTORIAL

HAND PAINTING A CHANDELIER & TUTORIAL

A few years ago, I painted the kitchen cabinets in my client's new home.
She wanted a darker, warmer tuscany finish.  I painted most of the high walls and ceilings and textured and faux painted several of the walls.
A few weeks ago, she called and said she was ready for a change.
This time she wanted EVERYTHING to be painted in very light colors.
Because of my schedule, this time I only painted the kitchen cabinets and another painter painted all of the walls, ceilings and woodwork.


Back in the tuscany days, she painted this chandelier for her breakfast room in a very dark green to go with the tuscany feel of her new kitchen.
But, for her new lighter colors she purchased a fabulous huge chandelier for the kitchen and since this smaller one is in the same room, she wanted them to be similar in color.  So, I painted, distressed and aged it with off whites and browny colors.


It looks really nice with her new colors and the new chandelier.
Those red lambrequin window treatments will be covered with new fabric.  I saw some samples and they WILL be beautiful!!  
My client does her own decorating and I love her taste.  To me, it's artsy and unique.


In this picture, I had already started priming.  
I almost forgot to take a picture of the "before" green.
It looks very different now, doesn't it?


And, here is her fabulous new chandelier.  It might look small, but that's because her walls and ceilings are very high.  This chandelier is 46" wide.  It just "made" her kitchen.  Her kitchen is large and cabinets spread out and the chandelier pulled everything together.
Very large and beautiful!


A close up of the finish on the new chandelier.
Next post I'll show you her "before" tuscany kitchen and then the new kitchen.  They're very different, but both beautiful in her home.

PAINT A CHANDELIER TUTORIAL

Through the years I've painted lots of chandeliers.  
When a client is changing her decor or if she just wants a change, it's sometimes easier and less expensive to paint than to replace.  To replace you have to shop and purchase and then pay an electrician to install it, hoping he's able to get it right the first trip.  It costs money if he has to come back.  But, sometimes the wiring or other things need to be changed, thus prolonging that hourly charge.  In home improvement I can do a lot, but for electrical and plumbing I always call a professional.  
It's so much easier for me if they can bring the chandelier to my studio.  
I just hang it from the ceiling, low enough for me to stand on the floor to paint.  
Sometimes they're huge and I do need a ladder to work on them. 
But, if I need to paint it in place in my client's home I do the same process that I would in my studio.  
I just have to be more careful about covering everything around the area. 
 First, I dust or vacuum the best I can.  Then, depending on the finish I will prime or just sand a tiny bit, very lightly.  It can be very tedious, especially if there are a lot of crystal and other decorations.  Then, you use a tiny or medium sized brush and start painting, distressing, aging, etc.  
At the end, you need to make a decision about sealing the paint.  Sometimes a sealer will change the dull look you wanted and make it shiny.  Many times, I just use an eggshell paint or acrylic craft paints.  They will dry to a hard finish.  Nothing is going to be banging or hitting your chandelier, so it really doesn't need major protection.  The main thing to remember is that with most painted surfaces, you need to be careful about using solvents because they can soften and remove the paint. If that happens, just touch it up.  If you need to use a solvent on the crystals or glass, just spray your product on a cloth and wipe.   If you keep it dusted, I think your finish will last a long time.
Make it beautiful!
Original post 9/14/14

Monday, September 4, 2023

PAINTING ARTWORK ON A FRONT PORCH WALL & PAINTING ROSES AROUND ROSE'S FRONT DOOR

   PAINTING ARTWORK ON A FRONT PORCH WALL & PAINTING ROSES AROUND ROSE'S FRONT DOOR

 My client asked me to do some artwork around her front porch area. 
 She wanted it to look "special" when company walked up to her front door.
     She told me to be creative and would leave it up to me.  
She said wouldn't even peek! She wanted to be surprised.
     So, I painted this crepe myrtle tree, kind of a pinky red.   I painted these two pots of flowers and some ivy on the wall heading up to her front door.  Of course, the pot in the corner is a real pot of fern and that made my artwork look more interesting.
  Her house was a really nice gray color with a dark blacky gray roof.  
It was a really nice color for painting all of these colors that I used.
     Her name was Rose.
I wanted to paint roses around her front door, in honor of her name.  
She LOVED that!
     I painted and crackled the front door.
  Then, painted a color from the roses on the little trim.
     This was a fun project!
Rose was very happy with her new front porch and door!
Original post September 3, 2012

Saturday, August 26, 2023

HAND PAINTING A BOUQUET OF FLOWERS ON BECKY'S OLD DRESSER & PICTURES OF BECKY'S BEAUTIFUL HOME

HAND PAINTING A BOUQUET OF FLOWERS ON BECKY'S OLD DRESSER & PICTURES OF HER BEAUTIFUL HOME

In my work I am so fortunate to get to visit and work in some of the most beautiful, 
well decorated  and unique styled homes.  
Becky has one of those homes and  she has the most wonderful!! taste in decorating.
 She had this old dresser and asked if I would paint a bouquet of flowers on the door.  
If possible, I always want to see a picture or something to show me what my client is wanting me to paint.  She told me the colors she wanted.  This is the bouquet I painted for her.
She was very happy with the bouquet, but I asked if she wanted me to distress and age/stain it. 
 She was a bit reluctant, 
then she loved it aged because it looked so much better with the finish of the old piece.
Becky found these crystal knobs at Anthropologie.
Isn't this beautiful!!  
Another picture of the same bedroom.
The "old" bouquet looks like it's been on that dresser since the beginning of it's time.
This is her living room.
Living room and entry to her home.
Another bedroom.
Her wonderful, wonderful kitchen.  
This is little Mabel.  What a sweetie!!
Don't you just want to sit down and have a cup of tea here!!
(Original post September 23, 2015)

Wednesday, August 2, 2023

DADDY'S SOCKS CHANDELIER CHAIN COVER

When I went back for touch-ups at the New Orleans house the chandeliers were hung and the canopies at the base looked sooo bare against the ceiling.  I knew they would look so much better with ceiling medallions and I mentioned it to the builder.  He asked me to go purchase and paint three for these particular chandeliers.  Then, he called me and said the electricians would be there the next day and could I have them there by 10: am.  I panicked, but got it done.


This HUGE chandelier in the stairwell had a tiny, dinky chain and I mentioned that it needed a chandelier chain cover.  So, the builder asked me to go find one.  The electricians were already there, taking down the chandelier, so I had to hurry over to Steinmart to see if they had any chain covers.  They didn't and I was walking around the store, back and forth, searching for something that could be wrapped around that dinky chain on the huge chandelier.  Anything, a scarf, anything that could wrap around that chain.  THEN,


 WAY ACROSS THE ROOM I saw some men's socks on a big wall.  Perfect!!  They  had some really good colors that would match the chandelier and the ceiling medallion that I had painted for it.  So, I bought a pack of three pairs in slightly varying shades and rushed back to the house to get them on the chain, so the electricians could hang the chandelier.
It looked wonderful!!! (thank goodness) The socks were hunky chunky and looked so much better on this large chandelier than the beautiful silk chain covers that you usually see.  


This is the ceiling medallion I painted to match the chandelier.  It's a lot of detailed work to paint these, but always look so, so nice on the ceiling. 
I used metallic gold, silver and bronze.


This fixture looks so good with the wrought iron railing in the stairwell.


These are the sock colors that I liked for the chain cover.    
I cut off the toe and the stretchy part at the top of the sock. 
Finally, everything was finished.  
I was worn out from all of that running around, but it felt good
 when the homeowner (to be), the builder, everybody was happy.
I was very happy, too!! 
When you need a chandelier or fan chain cover, remember socks.  I think they're great!  Not sure why we haven't thought about them, before.  They come in such nice colors, men's, women's, children's and are a really good choice compared to the ones you usually find, already made.
Original post 8/3/13

Sunday, July 16, 2023

USING A DARK GEL STAIN ON LORI'S FAMILY ROOM CABINETS

USING A DARK GEL STAIN ON LORI'S FAMILY ROOM CABINETS

In Lori's home all of the cabinets use to have a pickled, white washed finish.
 She asked me to paint some of her cabinets black/distressed.  The black looks amazing with her wood floors and decor.  Then, she asked me to darken her kitchen cabinets just a little bit so they would look distressed.  I used a gel stain on the edges and a little in the middle of the doors. 
The gel stain really toned down the pickled finish.
Recently, she called and wanted me to use gel stain on her family room cabinets.
Even though the cabinets were pickled, white washed, the wood was a little different and the wood soaked up more of the gel stain than in the kitchen.
 I painted on and wiped off with a rag. 
 It looked really, really nice with the brick on the fireplace.  
She is especially happy with the way the new color looks on the mantel.
There are so many different ways to use a gel stain.
This turned out to be a really good one.
Lori is very happy with the final result of her family room cabinets.
(Original post 12/26/16)