HomeMi CasaTutorialsInteriors etcMurals and ArtworkPainted Furniture

Thursday, August 30, 2012

PAINTING AN OLD GRANDFATHER CLOCK BLACK, DISTRESSING & EMBELLISHING WITH ARTWORK

   PAINTING AN OLD GRANDFATHER CLOCK BLACK, DISTRESSING & EMBELLISHING WITH ARTWORK  

My client wanted me to paint her grandfather clock.  I forgot to take a "before" photo, but it was brown stained oak, like you find everywhere.  The grandfather clock had been in her home since early marriage and she wanted to save it to give to her children for their homes, some day.  So, I painted it black, distressed it and painted artwork on it. 
The top was  not interesting enough, so I found a fleur de lis finial, painted it and attached it to the top of the clock.  That looked so much better because it filled in that empty space. 
 And, my client loved "french" decor.
I didn't paint the metallic gold face of the clock.  
I painted the wood around the face and the rest of the clock.
OMGoodness!!  Forgive my very messy studio, but it's even worse, now!
My client was very happy with her new grandfather clock.  
So, that made me happy, too!

Tuesday, August 28, 2012

(1) DRAWING & PAINTING LARGE "STICK" FAIRIES IN A LITTLE GIRL'S ROOM & TUTORIAL (2) FAUX PAINTING A WALL TUTORIAL

     (1) DRAWING & PAINTING LARGE "STICK" FAIRIES IN A LITTLE GIRL'S ROOM & TUTORIAL (2) FAUX PAINTING A WALL TUTORIAL

My client was redecorating and wanted me to paint her little girl's room purple and green and paint colorful "stick" fairies all around the room.  I painted the woodwork a very nice lime green and faux painted the walls with a medium purple color.

                                              FAUX PAINTING TUTORIAL
   You start with a base coat of paint on the walls.  Sometimes people think I use more than one color to faux paint.  The purple color I used to faux paint the walls did end up looking like I used two or three different colors.  I watered down the paint just a little so it would be easy to work with.  Then I used a rag and rubbed it out and around and blot, blot and that starts looking like you used more than one color.  Some spots and swirls look like the original color and as you rub out and around it thins out the color and the paint of the undercoat starts showing through.  That makes it look like you used more than one color.
     Then, I started the artwork...
First, I decided where I wanted to place the fairies around the room.
Then, I drew the outline of the fairies and flowers with a pencil.

"STICK" FAIRY TUTORIAL
A "stick" fairy doesn't have to be perfect.  These certainly weren't perfect and I think that's what made them look so cute and whimsical.  It would be so easy for anybody to do.  Just draw the outline, design your fairy and use craft paints.  Acrylic craft paints are very, very durable.  They dry really hard and can be wiped or gently washed. 
 I used sparkle paint on the fairy wings.
You don't have to draw them around the whole room like I did.  
If you want just one I think that would be really cute, too.
HAVE FUN!!
A few years back Alison 's mom redecorated Alison's room and this was the new fabric for her bedding.  She asked if I would paint these cute fairies on the wall around Alison's room.  (I call them "stick" because of "stick" figures.)  It was so cute and colorful that I was glad when the mom above asked me to paint something around her little girl's room. 
I knew how cute these "stick" fairies would be and was glad the mom agreed.
So, this fabric was the inspiration for these cute and colorful "stick" fairies.

Friday, August 24, 2012

PAINTING AN OLD DESK/VANITY TO A DISTRESSED AND AGED FAUX FINISH

      I really love painting furniture!!  And, this is one of my most favorite pieces that I've painted.
     My client gave me two really unusual old four poster bed frames and this old desk/vanity, and asked me to paint them all to match, for her little girl's bedroom.  I think most of this furniture had been in the family for many years.  She, also, asked me to paint a chest of drawers and little table and chairs pink and artwork, to go in the same bedroom with this desk/vanity.  I'll share those photos with you, soon. 
     This desk or dresser was stained a dark brown.  I painted, distressed and aged it with an antiquing glaze that I mixed.

It was a flat top, if you wanted to use it as a desk.  But, if you opened the middle section, there was a mirror to be used as a vanity.  And, a special place to keep your beauty products.  (Please excuse my staining rag, reflecting in the mirror!)

I love how this turned out!
My client was expecting another little girl, to be born shortly after I painted this furniture.  Soon, I will share the little table and chairs that I painted for the two little sisters. 

Friday, August 17, 2012

PAINTING WALLS & TWO CABINETS TO AN "ANTIQUE SILVER" FAUX FINISH FOR DEBBIE

PAINTING WALLS & TWO CABINETS TO AN "ANTIQUE SILVER" FAUX FINISH FOR DEBBIE     

I'm working at Debbie's house, again.  
A few posts ago, I shared my "antique silver" wall that I painted in her master bedroom behind her beautiful iron bed.  Now, she has remodeled her master bath and has done a beautiful job of picking out the marble tiles, granite counter tops with two sinks, paint colors and chandelier!  When she first started designing her new bathroom, she planned an area so she could have an "antique silver" wall over her new bathtub.  You can see the bedroom wall and this wall at the same time when you're standing in either room. 
My ladder is standing in her new bathtub.  The walls were a little high! 
Debbie loves my "antique silver" faux finish. 
So, I textured, painted and aged the walls inside her tub surround.
She wasn't too happy with her window and was thinking about getting rid of it.  She asked my opinion and I said it looked like a cross to me.  Since Debbie loves crosses, she decided to keep the window.  As I was painting the "antique silver", I painted the frame around the window a little differently so it would stand out and it really does. 
Debbie likes her window and is very happy with her new cross.
As I was working, Debbie asked me to paint two cabinets in her office to the "antique silver".  
This is how they turned out.  She's looking for very special knobs to go on the cabinets.
She has two really sparkly, coppery paintings to go over these two cabinets and that's why I trimmed them out with this coppery metallic paint.  Remember, metallics reflect.  So, if there's no light coming from somewhere you really don't see the unique beauty of the metallic paint.
 

I love working with Debbie.  She has two very friendly dogs and two very friendly cats.  Nickie and Lola cat have very interesting, friendly personalities!  Bella dog is blind, but gets around very well and is much loved.  Charity is a beautiful chocolate cocker spaniel.  
I really love animal behavior and always love the pets where I'm working.
~
More "antique silver" faux finishes I painted for Debbie:

Tuesday, August 14, 2012

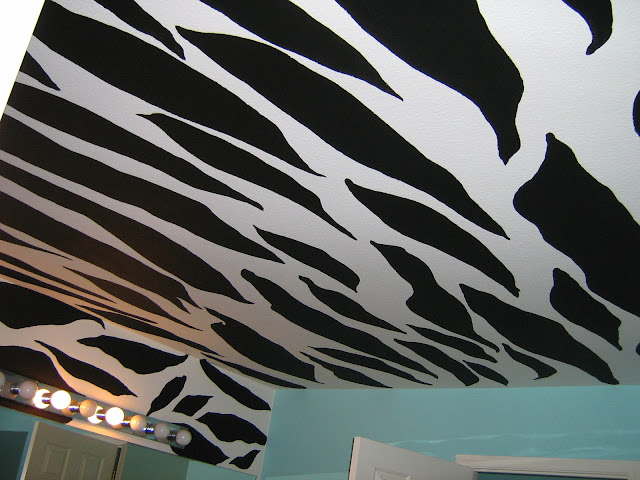
PAINTING ZEBRA STRIPES ON A CEILING & TUTORIAL

    PAINTING ZEBRA STRIPES ON A CEILING & TUTORIAL

 Robin was redecorating her daughters' bathroom and they wanted a zebra stripe theme.  So, Robin asked me to paint the walls a very nice aqua and zebra stripes on the ceiling.  I've worked for Robin for years and her ideas are always great, but some are a bit challenging!  We had to decide which way the stripes would go and we chose "across" the room instead of the length of the room.  I think it was a good choice.  It's like we were going around the zebra, not head to tail, as you viewed the room.
I've painted zebra stripes several times.  On a unique stool, furniture and one wall.  It's not hard to paint them, but might be a bit awkward for a beginner to paint them on a ceiling.  It wasn't too hard for me because I'm always climbing on a ladder and looking up.  From time to time people have asked if it hurts my neck and I just say "no, I'm used to it!".
~
PAINTING ZEBRA STRIPES TUTORIAL

When I'm starting a new project I always do lots of homework.  For zebra stripes I went online and studied lots of photos of zebras.  Their stripes are truly amazing!  and, they're all different shapes and sizes.  So, I knew I couldn't go wrong.  On furniture, on a wall and on this ceiling, I always use a pencil and draw them first.  It's very easy!  Just draw, draw, draw long uneven stripes, mostly coming to a point at both ends.  Then, I use a little artist brush to paint the points and outline of the whole stripe.  Then, I use a tiny roller and paint the inside of the outline/stripe.  Painting black on a white ceiling you might have to do a second coat.  If you put a heavy first coat of black, brushing and rolling, you probably won't need to do a second coat.

Black and white are the most common colors I usually see on "zebra prints".  But, if you look closely at a zebra's coat they vary from off-white to a beige color.  Whatever your color scheme is will determine how white you want the background to be.  But, the little stool I painted and the wall I painted a little bit off-white and  black stripes.  Then, I glazed over them with an aging/antiquing glaze.  I think the colors were wonderful!!  And, those particular colors don't have to be for a kid's room.  They look great with  beiges and browns, blues, greens, so many colors.
HAVE FUN PAINTING YOUR ZEBRA STRIPES!!

Wednesday, August 8, 2012

DOORS, DOORS, DOORS!!

My client wanted me to paint a special, multi-layered finish on these very large doors.  After they brought them to my house, I started trying to figure out how to work on them, all at one time.  Since there's layering of coats of paint, it's good to do each layer on everything one time, at the same time.  It's just an efficient way to keep from having to clean your equipment more than once and it's faster. 

My friend always knows how  to make things better, when I'm all confused about what to do. (Lucky me!)  I wanted to work in my front yard, so he and his friend put a brace on all eight (giant) doors to connect them and that made them so easy to work on, all at one time.
So, I worked all day in my front yard and got two layers of paint on them.  And, even though it's hot here, I was so thankful for all the trees I had planted for the birds.  I was working right under my very tall and wide montezuma cypress and it  was so nice and breezy.  I was very comfortable in the heat.
There are eight doors, but as I'm painting, to me, it's SIXTEEN SIDES!! 
This is the "antique silver" finish I painted on them.

Friday, August 3, 2012

WHITE KITCHEN CABINETS TO A HAND PAINTED STAINED WOOD LOOK AND WHITE DISTRESSED KITCHEN ISLAND

Alison wasn't satisfied with the look of her kitchen.  The cabinets and island were a grayish off white.


So, her decorator suggested that she have me apply a special faux finish to make her cabinets look like a dark stained wood.  She said it would make Alison's kitchen look "richer".  Her kitchen was very large and it took me a while to do all of those layers, but this is how the cabinets look, now.


Her decorator suggested that the island should be a contrasting color and she asked me to make it look old and distressed.  So,


The decorator was right!  The light colored island looked so nice with her new dark cabinet finish. 


One side of Alison's home was mostly huge glass windows and they overlooked a large, beautiful canyon.  The whole time I was working there, I loved looking out the windows at the canyon.  And, a couple of those days, it rained and that was just sooo beautiful, too. 
Alison had three boys, (two of them twins), two dogs and a very old cat...such a lovely home and I loved working with them!
(oh, and she, also, had a very nice husband)
                              

Wednesday, August 1, 2012

ANTIQUE DRESSER THROW-AWAY!!

Last week, the city sent out their Bulky Item Collection Notice.  So my neighbors have been putting out their bulky items to be picked up.  This afternoon, I looked across the street and my neighbor had this out by the street for the city to take away!!  OMGosh!  I went over and asked her if I could have it, so she helped me bring it home.  It looks very old and, obviously, handmade.  You can see the nails and screws on the back and it doesn't look like it came from a factory. The little knob is so pretty and my neighbor has the other three somewhere and will give them to me, later.


Also, it had this writing on the back and I can't quite make it out.  The 1936, I'm not sure if that's the year it was made and it looks like Rose Bley.  Tomorrow, I think I'll wet this writing and see if that makes it more easily read.  If anyone can read this, please let me know what it says.