HomeMi CasaTutorialsInteriors etcMurals and ArtworkPainted Furniture

Saturday, May 26, 2018

PAINTING A NEW, FRESH LOOK FOR YOUR FRONT DOORS WITH SPAR VARNISH

PAINTING A NEW, FRESH LOOK FOR YOUR FRONT DOORS WITH SPAR VARNISH

Mary is getting her home ready to put on the market for sale.
 She asked me to make her beautiful front doors look better.  The finish was really dull, probably from all of the oak pollen that recently spread everywhere and just normal wear.  
Several years ago, I sealed these doors with oil based spar varnish.
You can find it at most paint stores.
It is a very hard drying sealer.  
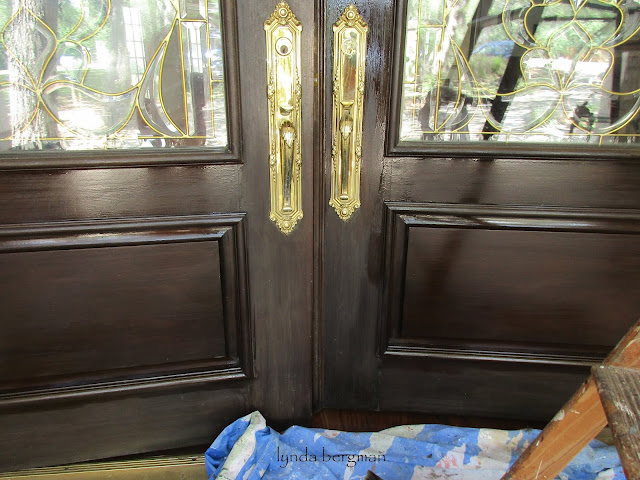
I took a picture of before and after I applied the varnish.
Look at the dull finish just under the door handles.
The door panels have been varnished.  See the difference and how nice the varnish looks?
If you want to varnish your doors, first clean them really well. 
I applied the varnish with a paint brush. 
You do have to use paint thinner to clean your brushes.
 It's always best to ask your paint store how to use the spar varnish. 
They can give you pointers to make your job easier.
I think you will be very happy with the new, fresh look of your doors.

Wednesday, May 23, 2018

USING GEL STAIN TO MAKE AN OLD MIRROR FRAME LOOK NEW AGAIN

USING GEL STAIN TO MAKE AN OLD MIRROR FRAME LOOK NEW AGAIN

The finish on this mirror frame was old, scratched and very dull.
I told my friend I could make it better.
I sanded lightly.  Brushed a gel stain over the frame and wiped off with a rag.
After that dried, I sealed the finish with a water based satin clear coat.
(before I worked on it...still dull)

Monday, May 21, 2018

PAINTING AN OLD GOLD LEAF PICTURE FRAME TO HANG MY ARTWORK DOOR KNOB PILLOWS

PAINTING AN OLD GOLD LEAF PICTURE FRAME TO HANG MY ARTWORK DOOR KNOB PILLOWS
Recently, I was invited to show my pillows and artwork at a pre-Mother's Day event.
I made little door knob/bed post/hang anywhere pillows.  They are my artwork on fabric.
They needed a way to display, so I used one of my old frames.  The frame has a beautiful metallic gold/gold leaf finish.  I knew it would look so beautiful with yellow apple green.
I removed the old print that was in the frame.  Cut a piece of very thin lauan plywood and glued it to the back so it would be sturdy enough to hold door knobs and pillows.
 Painted it green.
I found these glass door knobs.  Drilled holes in the lauan and attached them from the back.
Found the little crown finial, painted it green.
I was so busy talking to people I forgot to take good pictures.
 This distorted picture is the only one I could find.
 I'm sure you get the idea, though.  (For your projects)
I will be adding more pillows to my Etsy Shop today or tomorrow.
~
FOR MORE PILLOWS VISIT MY ETSY SHOP

Saturday, May 19, 2018

PAINTING A DARK WOOD PANELING WALL ~ SO MUCH LIGHTER, NOW!

PAINTING A DARK WOOD PANELING WALL ~ SO MUCH LIGHTER, NOW!

I went to a client's home for a paint bid for her kitchen.  While I was there she said her house seemed really dark.  I suggested that she paint the paneling behind her stair rail.  She did paint that wall and sent this picture to me.  She said she couldn't believe the difference.
 The room was so much lighter, now.
Doesn't it look nice!!  And, she did the painting.

Sunday, April 22, 2018

PAINTING WHITE MIRROR FRAMES TO A METALLIC PEWTER & BEIGE FAUX FINISH

PAINTING WHITE MIRROR FRAMES TO A METALLIC PEWTER & BEIGE FAUX FINISH

My client asked me to paint her mirrors to a metallic pewter faux finish.
I painted a dark gray undercoat.
Painted on and ragged/blotted off a light beige color.
Used a metallic gold for the beading and small trim around the edges.
Painted on and ragged off the metallic pewter.
Then sealed it with a clear sealer.
Getting started.
They sent this picture to show me how everything looks, newly decorated.
They're very happy with the new mirror finish.

Tuesday, April 17, 2018

PAINTING A KITCHEN VENT HOOD TO A BLACK & METALLIC GOLD FAUX FINISH

PAINTING A KITCHEN VENT HOOD TO A BLACK & METALLIC GOLD FAUX FINISH

This is the kitchen vent hood I painted for the client in the previous post.
It was custom built to fit between two cabinets over the stove.
The decorator wanted me to paint it black and metallic gold for the new kitchen.
I painted black, then brushed on the gold.  Remember, metallic paints "reflect".  
If there is not a light source it won't shine/reflect.  
There are lots of windows and lots of light in this kitchen.
They brought the vent hood to my home for me to paint.  I suggested adding large upholstery tacks on the outer edges and across the front.  It would have looked really nice, but the client didn't want them.  If you build yourself a vent hood, consider the upholstery tacks. 
You can paint them or leave them the original color which is, usually, brass or bronze.
The carpenter put the vent hood in place to see that it fit properly, then brought it to me.
I painted that gray cabinet in the dining area to an aged and distressed finish.
Ready to go it's new home.  
New paint, especially layers of paint for a faux finish
 stay soft for a while.  So, we, carefully, brought it out of the house to be picked up.
Notice that black strip at the top.  The plan was to bring the stained brown kitchen crown molding around the top of the vent hood.  I think it would look much better to take the black and gold finish all the way to the ceiling.  But, I'm wasn't the boss of that :)
I'm not sure I'll ever go back to this house and get to see how it looks with all of the new decor. 
 But, I did enjoy painting and working on it.

Sunday, April 15, 2018

PAINTING A GRAY DISTRESSED & GLAZED TECHNIQUE ON A CABINET & MAJOR HOME RENOVATION

PAINTING A GRAY DISTRESSED & GLAZED TECHNIQUE ON A CABINET & MAJOR HOME RENOVATION

When I was working on this job I got permission to take extra pictures of
the major renovations.  I wanted to share them with you.
This cabinet in the breakfast room was beige.
The decorator asked me to paint it to a dark gray and distressed finish.
This is the sample she and the client approved.
The paint color is BM 1551 La Paloma gray.
I distressed and glazed over that color.
This is the color before I glazed it with a very dark brown color.
I first painted a wood color that would show through the distressing technique.
This is the fabulous view I had while I was working.  It's out in the hill country.
They're building a swimming pool out behind the deck.
This is what I wanted to show you.  That opening in the back of the picture was smaller like a double door size.  They opened it almost the length of the room.  Those kitchen cabinets you see in the back of the picture are new.  There was a doorway there to go into the dining room.  
Since they didn't need a dining room, that is going to be an office.
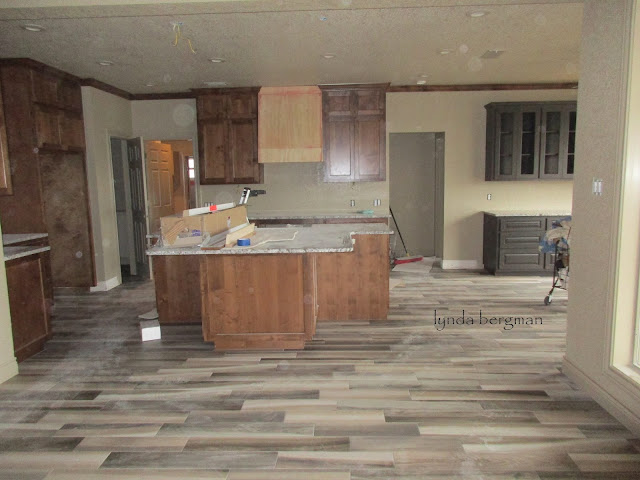
This huge opening between the kitchen and family room was a small double door opening.
 They opened it all the way across from wall to wall.  It is really, really nice, now.
They built a much larger kitchen island.
They added the beams.
There used to be big cabinets on either side of the fireplace.  
They removed them and added the shelves. 
 I'm sure it looks much better and more open, now.
While the carpenters were there, the client had them build this bed for their dog.
Can you imagine that small opening, before, between these two rooms.
The vent hood in the background is newly built.
They're going to bring it to my house so I can paint it black and aged metallic gold.
I think there was a cabinet above a smaller vent hood, before.
This new one is really nice all the way to the ceiling.
I love the flooring.  It's not wood.  
It's tile that looks like wood in different shades of grays and browns.
~
I LOVE THAT I GET TO WORK IN SUCH BEAUTIFUL HOMES.
~
FOR HOME DECORATING PROJECTS & TUTORIALS
VISIT MY
LYNDA BERGMAN DIY BLOG