HomeMi CasaTutorialsInteriors etcMurals and ArtworkPainted Furniture

Sunday, April 12, 2026

HAND PAINTED & DISTRESSED COUNTRY FRENCH CABINET WITH BIRD & NEST ARTWORK

HAND PAINTED & DISTRESSED COUNTRY FRENCH CABINET WITH BIRD & NEST ARTWORK

SAVE YOUR OLD FURNITURE & MAKE IT NEW AGAIN

 My client wanted me to paint this cabinet for her store.  She left the colors up to me and asked me to make it country french.  I painted a soft red as an undercoat then I painted it yellow and distressed it. I painted the trim a soft blue.  Next, I painted the bird and nest artwork on the doors.  After I painted the artwork, I glazed the chest and cabinet with a greeny brown antiquing glaze that I mixed.  Clear glaze and a bit of paint.  Mix well.
     Sometimes I have so much going on in my studio, that I have to work in other rooms of my house.  This is my dining room and these pieces were so large that I had to move my table and chairs into the living room.  It's always a bit crowded, but not for long. 
     In my work, painting furniture is my very favorite thing to do.
I left the soft red color inside the top of the cabinet.
  The shades of red, yellow and blue looked wonderful together.
I love my job!
(Original post 12/18/2014)

Saturday, March 14, 2026

PAINTING A WHITE PANTRY DOOR TO AN AGED DISTRESSED FINISH & PAINTING ON GLASS FOR ANNA & DIEGO

PAINTING A WHITE PANTRY DOOR TO AN AGED DISTRESSED FINISH & PAINTING ON GLASS FOR ANNA & DIEGO

Anna and Diego have a beautiful new home.
Their pantry door was white and they asked me to paint it to make it look old.
Like the wood panel at the bottom of the door, there was a wood panel at the top.  
They asked a carpenter to cut the top wooden panel out and prep it for a piece of glass.
They wanted me to paint a design and "EL MERCADO" on the glass.
I showed Anna some of my stencils.
 We chose from each stencil the design she wanted on the glass.  
I painted the top design first and sent a picture to Anna.  She decided that we needed to take away pieces of the bottom stencil so it wouldn't look so busy.
I used graphite paper to trace the design onto the glass.
And, used an eraser to erase the part of the design that Anna didn't want.
I used a tiny brush to paint with DecoArt black glossie paint.
Two coats of paint and sealed with a sealer for protection.
Door before I painted it.
Anna just sent this picture to me.
 She found this crystal knob and backplate at an antique store.
They want me to do something to it to make it match the door.
I will touch up the screws, too.
Thank you to Anna and Diego for a fun project!
Their kitchen cabinets have a light brown glaze that goes well with the door.
(Original post 6/24/18)

Tuesday, December 2, 2025

PAINTING A WROUGHT IRON BED TO A DISTRESSED RED FINISH FOR DEBBIE

PAINTING A WROUGHT IRON BED TO A DISTRESSED RED FINISH FOR DEBBIE

Debbie had a beautiful wrought iron bed.  The color was very dark.
 She decided she wanted it painted red, so she called me.
One bedroom wall was papered with this metallic damask patterned paper.
The red looks amazing!!
I needed some way to make the headboard and footboard stand so I could paint both sides at once.  I already had hooks on my ceiling, so a neighbor helped me tie them so they would stand. That made it so easy  to paint.
 Debbie wanted the finish distressed.  Here is a close up of the finish.  Besides the dark color coming through the red paint, I scraped a little harder and let the white undercoat come through in a few places.
Debbie was excited to find this comforter.  She said it was exactly what she was looking for.
BEFORE
~
VISIT MY
STILL WORKING ON IT ~ ADDING MORE & MORE TUTORIALS
VISIT AGAIN, SOON
Original Post 12-3-2017

Thursday, October 30, 2025

PAINTING BLACK, STENCILING METALLIC GOLD & DISTRESSING A FANCY BOARD FOR CODY

Cute, wonderful Cody is Christa's little yorkie.  When there's a lot going on in the house and she needs to confine him she has a board that she puts across a doorway. 
 Cody can still see out, but he can't get over it.  
It was just a plain board and she asked if I could paint something on it.
So, this is what I painted.  I painted and distressed it in black.  Then, I embossed the stencils and painted the stencils and Cody's name in metallic gold paint.  The board is 4'x12", but it was important to remember that the doorway opening was around 32 inches wide.  So, I needed to make sure the placement of the stencils was within that space.  This painted board might seem unnecessary and you wonder why even paint it.  Well, if you have an orange unfinished piece of wood in the middle of your beautifully furnished room, you understand.
And, embellish is what I do!!
On the other side of the board I just painted it black, stenciled in metallic gold paint and added their initial.  Also, I rubbed the metallic gold paint around the outer edges.
Their home is so beautiful and I thought I would paint this board real fancy for them.
Christa told me they LOVED the board and thought it was "awesome"! 
That made me feel really good and so glad they were happy.
I was thinking that this board would make a really nice bench, too.  
Or, the back of a bench or even a headboard. 
 Now, I'm thinking of lots of uses for this board and it was really easy to do.
Also, she asked me to paint the picture frame in a distressed black.
(It's just above the board.)
Original Post 12/3/13

Sunday, October 26, 2025

SELL YOUR HOME FAST ~ PAINTING A BLACK DISTRESSED FINISH ON LORI'S NEW WET BAR

SELL YOUR HOME FAST ~ PAINTING A BLACK DISTRESSED FINISH ON LORI'S NEW WET BAR

Today I received this text from my client Lori:
"Lynda, look how beautiful you've made the house and it sold the first day is was on the market!" 
Wow!  The first day!!  Painting cabinets really does make a difference.  The past few years, I've painted nearly all of the cabinets in Lori's large home.
~
Below is my post from March, 2014.
PAINTING A BLACK DISTRESSED FINISH ON LORI'S NEW WET BAR
~
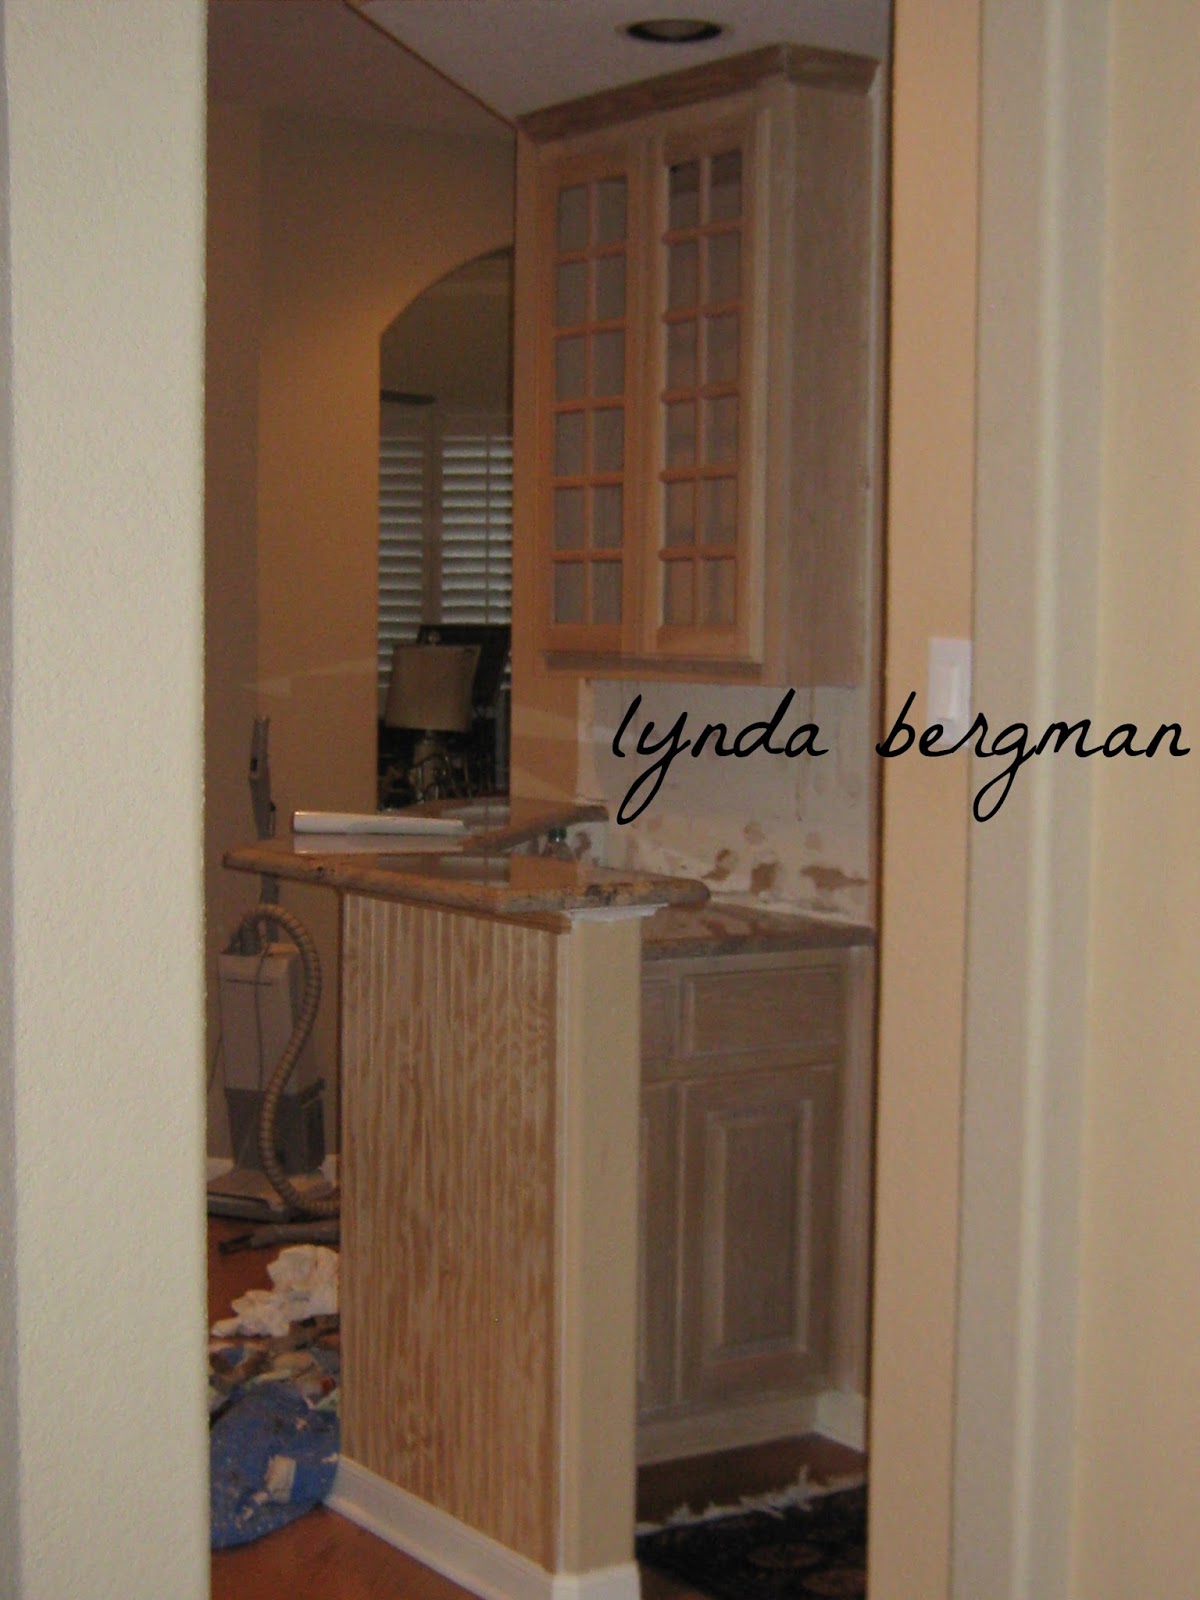
Lori wanted to change her wet bar area.
  She had a new cabinet built and had beadboard installed on the wall under the bar.  Also, she added new tile on the back splash.  She showed me a picture of the special finish she wanted on the new and old cabinets.  The original cabinets were the pickled/white washed finish.
She wanted black distressed.
(She's having walls and ceilings painted and she said the other painter could touch up my messy lines.)
This wet bar is kind of in the middle of her living area and the new wood that she added and the black distressed finish look just wonderful!!  
Black is such a good "accent" color and for this wet bar, such a great choice. 
Remember Panda Lu?
  When she was tiny, Lori taught her to ring that bell when she needed to go out and it's the cutest thing!  She will keep touching and ringing the bell until someone notices and lets her out.  Her sister, Buffy, is a senior doggie and doesn't think much of ringing the bell.  But, when Buffy is standing at the door to go out, Panda Lu will ring it for her.  I was working right there by the door and it tickled me to watch Panda Lu managing all the "going out" time.
Selfie of my leg :)  
I always sit on the floor to paint the baseboards and bottom of whatever I'm painting and since the floor is cold in winter, I wear long socks and they're so warm.  I have colorful socks to match all of my paint clothes.
 I'm really colorful, but I'm good with that!!
I just love the black contrast with her lighter floors and walls.
Lori planned, very carefully, the design of her new wet bar.
So glad I got to paint it for her and she's very, very happy.
 This sweet message was in an email she sent to me.

                                           Thank you Lynda, and Brian is home now and loves all your work.
                 Thank you again, you’re the BEST!! Your talent is a true treasure and I couldn’t ‘create’ without you!!
                                                                                                 Lori
 That makes me feel really good!
 Thank you, Lori!! 
~
A link to Lori's upstairs bath cabinets that I painted:
PAINTING LORI'S GUEST BATH CABINETS TO AN AGED GRAY BROWN FINISH

Wednesday, October 15, 2025

HAND PAINTING TOY SOLDIERS ON A LITTLE BOY'S FURNITURE

HAND PAINTING TOY SOLDIERS ON A LITTLE BOY'S DRESSER

My client had an old chest of drawers and asked me if I could paint it for her little boy's room.
She said he loved toy soldiers.
She was decorating his room with red white and blue, so those are the colors 
I used for the artwork.  The toy soldiers are guarding the castle.
Her little boy was very happy with his toy soldiers.
And, I had fun painting the dresser for him.
The dresser "before".
There were handles and knobs missing. so I painted wooden ones to match.
Original post 4/26/2015.

Wednesday, August 6, 2025

HAND PAINTING ARTWORK ON FOUR GROIN CEILINGS FOR PATTI'S NEW HOME & TUTORIAL

HAND PAINTING ARTWORK ON FOUR GROIN CEILINGS FOR  PATTI'S NEW HOME & TUTORIAL

     When Patti was building her BEAUTIFUL! new home I spent more than 3 months working there.  But, for about a year before that she was bringing me all sorts of things to paint for her new home.  She brought me tiles, furniture to be installed in baths, light fixtures, lots of different things, even her weathervane to go on top of her home. 
     This is the entry hall to Patti's very beautiful home.  There are four groin ceilings in a row surrounded by these amazing stone walls.  When she was building her new home she asked me to paint artwork on these four ceilings.  Using the same colors I painted a different pattern on each one. 
Aren't these light fixtures SPECTACULAR!!
The base coat on the ceilings was a light beigy brown.
The first thing I did was draw all of the scrollies and the center flower at the base of each light fixture.  Next, I used a small brush and painted everything.  Then, I used a tiny brush and a very dark blackie brown paint and outlined all of the artwork.  When I was finished with alllllll of the artwork I brushed on and wiped off with a rag a very light brown aging glaze.  The glaze was a really nice finishing touch.  It tied everything together and looked so good with her darkly stained pine wood floors and stone walls.
                 It was lots of hard work, but I'm very proud of how everything looks now.
                 Patti has such great taste and it really shows in this wonderful home.
                                                              THANK YOU, PATTI!!
Original Post January 15, 2013