HomeMi CasaTutorialsInteriors etcMurals and ArtworkPainted Furniture

Monday, November 24, 2014

MY CRANBERRY SAUCE RECIPE

MY CRANBERRY SAUCE RECIPE

1/4 cup red wine
1/4 cup orange juice
one lb. fresh cranberries
1/2 teaspoon cinnamon
one apple, finely chopped
Cook til the cranberries stop popping

It's so delicious! 
My friend Ruth gave it to me years ago.

Sunday, November 23, 2014

REPAINTING ROBIN'S DINING ROOM WALLS AN ELEGANT CHARTREUSE GREEN

REPAINTING ROBIN'S DINING ROOM WALLS AN ELEGANT CHARTREUSE GREEN

A few months ago, Robin asked me to paint her dining room an off white and brown.
I painted over a beautiful deep burgundy that I painted when she first bought her home.
The new off white walls with brown ceiling and brown below the chair rail looked so elegant and nice.  But,


the off white was just too boring for her taste.  She found some new fabric to recover her chairs and asked me to paint her walls this LOVELY chartreuse green.  It looks sooo good with the brown and  the metallic gold trim.  Years ago when I painted the burgundy, I painted the crown molding and baseboards a crackled metallic gold.  It looked really fancy and fine in her beautiful dining room.  Now, it still looks really good with her new chartreuse and brown.


  It's wonderful and happens to be in the tones of my very favorite colors.  
I love  chartreuse and yellow greens.


This is the elegant off white and there's Robin holding her little cat Mitzi.  Mitzi loves her mommy and one of her big sisters, but NOBODY else!!  


Earlier, I had embossed and painted some scrollies around the room.  To save time, Robin said she would paint around all the scrollies for me.  I gave her a tiny brush and she went to work.  She did a really good job, too!


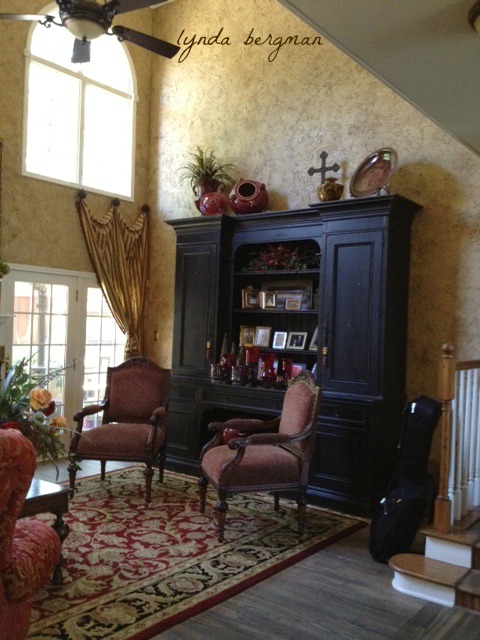
This is her living room.  I textured and faux painted those walls.
Those walls are really high!


Isn't it beautiful!
I've worked for Robin for many years and love working with her.  She loves her home and is always finding ways for me to spruce it up for her.
Robin,
Thank you for letting me be a small part of your beautiful home.

Sunday, November 16, 2014

LOOK AT MY SMALL FOLDING LIGHTWEIGHT DOLLY

LOOK AT  MY SMALL FOLDING LIGHTWEIGHT DOLLY


Found it at Lowes's.


It was 25.99.  and holds 150 lbs.
When it's folded, I can store it almost anywhere, even carry it in my car.
It will certainly come in handy in my work.


See how it folds?
I have two other dollies, but they don't fold  like this one.
Great find for me!

Saturday, November 8, 2014

ANOTHER PAINT TOUCH UP FOR TUSCAN/OLD WORLD KITCHEN CABINET SPECIAL FINISH

ANOTHER PAINT TOUCH UP FOR TUSCAN/OLD WORLD KITCHEN CABINET SPECIAL FINISH

Then, another client called and told me she had just replaced her microwave oven and needed me to come by and touch up around the edges.  
That's two in a month!
I'm thinking everybody is getting ready to do some heavy holiday cooking.


This picture is "after" I touched up around the microwave oven.
This is a kitchen/cabinet finish that I painted last year.
I try to always keep the formulas for the finishes, so I'll know the  tones for touch ups.  But, when I have to touch up these finishes that I paint, I don't start from the beginning.  I use craft and other paints, mix them to the exact color the cabinets are now.  And, then I use the same clear coat sealer and seal them really well. 


This is a close up of the tiny bit of the original dark cabinet finish showing around the edges.  When they are so small and close to the appliance, it's easy to hide the new paint.  Touching up a scratch in the very middle would be a lot harder to hide.
I love this kithcen!

Saturday, November 1, 2014

TOUCHING UP PAINT IN JACKIE'S TUSCAN KITCHEN

TOUCHING UP PAINT IN JACKIE'S TUSCAN KITCHEN

The post on me painting a tuscan finish on Jackie's kitchen cabinets is one of the most popular posts  and most viewed on my blog.  Recently, she replaced her oven and microwave oven and needed me to touch up the paint around the edges.


As I was leaving and talking to her, I said you look so pretty standing there, may I please take a picture of you and put it on my blog??  She said "ohhh, ok". 
Doesn't she look so pretty standing there!  She's in the medical field and very, very bright.


A tiny bit of the old cabinet color was exposed when they replaced the ovens.  All I had to do was darken and rough up about 1/2" around the area.  It matched the other distressed and aged finish and you really couldn't tell it was new paint.  
When I have to touch up any of the cabinets that I've painted, I don't go through the several layer paint process that I did in the very beginning.  That would never work and would look very different.  I use craft and other paint and mix until I get the exact color and touch up with that.  Then, I seal it really well, again.


Isn't her kitchen beautiful!  It's so warm and cozy.  
It looks like it's ready for Thanksgiving and the holidays.  I can just smell the cornbread dressing...oh wait, that's what I do.  I 'm hungry for it right now!!

Link To Original Post

Saturday, October 25, 2014

PAINTING GRAY & WHITE FURNITURE FOR KATIE'S NEW HOME

PAINTING GRAY & WHITE FURNITURE FOR KATIE'S NEW HOME

Patti has funky wonderful taste and is helping a young school teacher decorate her new home.
She went shopping at Goodwill, thrift shops and probably estate sales, looking for furniture for Katie.
Then, she brought these pieces to me and asked me to paint them.


The dresser is (I think) Henredon and a very nice piece of furniture.
The armoire was pine.  Patti is going to cover the back of the armoire with fabric and it will be a tv cabinet.  You'll see the fabric back when it's open.


These are the handles that she chose to go on the gray and white pieces and I'm sure there are fabrics and accessories in the room in these colors, too.


Almost any paint finish I do takes several layers.  So, while I was painting the dresser drawers, I had to keep taking them in and out to paint the dresser frame.  I would stack them in this chair and they were a bit wobbly on that cushion.  
I kept hoping that guardian angel would watch over them and she did.
They did not fall!


This was a queen size pine bed and Patti wanted it painted white.  I'm sure she found something really neat to use as finials on top of all four posts.


These two pieces, I think she told me she found them at Goodwill.
You should see them painted white.  They were both just as cute and special as could be.


Remember, I showed you some things I painted for Patti's beach house?  
She brought this carved surfboard and it was painted blue where the gray is now.  I painted the gray, left the little orange stripe and the middle is the original color.
Can't you just see this hanging on the wall of her beach house!!


This is a close up of the paint finish.  I didn't distress the white, only the edges of the gray.
Patti and I moved all of the furniture in and out.  She's very strong, but it's always a bit of a struggle for me.  Somehow I always end up going backwards.  Not sure how that happens!
Bye, bye furniture!!

Tuesday, October 21, 2014

MY FIRST DIY eBOOK PAINTING WITH A GEL STAIN

MY FIRST DIY eBOOK PAINTING WITH A GEL STAIN

Recently, I completed my first instructional eBook.  
It's about painting a door, but you could use the same information for painting woodwork trim in your home, a piece of furniture, kitchen cabinets or anything that might be painted with paint and you want it to look like a stained wood.
 ~
A client got a new front door and it had a white primer on it.  She wanted a dark stained wooden front door but the one she wanted was really expensive.  A friend told her that it was easy to stain the white one with a gel stain and make it look similar to the one she liked.  Since she's not really a painter, it was a challenge for her and didn't turn out the way she thought it would and gave up!
So, she brought it to me.
I work with gel stains a lot and decided to compose an eBook to show how I work with gel stains because they're a little tricky to work with.  This 13 page eBook shows you step by step how I use my brush strokes to simulate wood grain.
If you are wanting to change any door, cabinet or piece of furniture and would like to see my technique, here is a link to purchase my very first eBook in PDF form.


If you're interested in my eBook, but would rather have a 
"PRINT COPY"
that is available for purchase, also.
Thank you for your interest!