HomeMi CasaTutorialsInteriors etcMurals and ArtworkPainted Furniture

Friday, May 17, 2024

AN EXCITING NEW & MODERN LAUNDRY ROOM FOR MY CLIENT ~ PAINTING & REMODELING

AN EXCITING NEW & MODERN LAUNDRY ROOM FOR MY CLIENT ~ PAINTING & REMODELING

My client wanted to remodel her laundry room.  She asked me to paint her cabinets, walls and ceiling.  The darker color in this picture is the actual color I painted on the cabinets.  The light from the window is playing tricks with the new paint colors.
She added new granite counter tops and flooring.  A newly built cabinet is on the left of this picture by the sink.  It goes all the way to the ceiling.  To make the cabinets look consistent, she had her carpenter add new panels above the existing cabinets.  (picture below) 
The overall look is so nice, now.  One of my favorite things is the new enclosure and granite top added over her washer and dryer.  Before, the washer and dryer were free standing.  Her carpenter building and adding this enclosure gives my client more flat surface for folding clothes, etc.  
These two are new cabinets.  I think they were just doors and cabinet, before.  These new enclosures are room for tall clothes hampers.
New tile flooring.  I love her new floor!
New light fixture with a fan in it.  
On the left is the newly built cabinet that goes all the way to the ceiling.
This pictures shows you the new panels the carpenter built and installed so the cabinets would be consistently tall to the ceiling.  It makes the whole room look better.
Me painting the new upper panels and trim.
I forgot to take a picture of "before".  This is a wonderful laundry room re-do with lots more cabinet/storage space and it is really beautifully decorated.
Original post was on 9/9/2019.

Saturday, April 27, 2024

FROM BATH CABINET TO A HAND PAINTED ARTSY BIRD CABINET & TUTORIAL

FROM BATH CABINET TO A HAND PAINTED ARTSY BIRD CABINET & TUTORIAL

In the home where I was working my clients happened to be remodeling one of their bathrooms.  They were replacing their cabinets and put them in the garage to be hauled off.
One of the cabinets was a linen cabinet that hung over the commode.
When I saw it in the garage I just knew I could do something special with it.
I bet lots of you have this same cabinet over your commode with the opening on the bottom for tissues, towels, etc.  I asked a carpenter to help me with the feet.   
I asked him to turn it upside down with the opening at the top.  Then I found these feet at Lowes.  Actually, they are fence post finials.  I asked him to attach these feet to the cabinet.  The little wrought iron corner pieces I found at Hobby Lobby...LOVE their 40% off coupons!!
I added the new handles, too.
I started painting it.  I primed and painted it a soft blue.  I painted all of the artwork on front and sides.  Finally, I aged it with an antiquing glaze and sealed it with a clear coat.
I painted the inside an off white that matched the other artwork.  
I painted little metallic dots on the front of the shelves.
Painted metallic copper/bronze around the feet and a couple of other places on the cabinet.
I really loved how this cabinet turned out and it sold very quickly!  
One of these days I think I will get to see it again in a client's home.
I do hope so!!
Because I forgot to take a "before" photo of the original linen cabinet
I found this on Google to show you.  I wanted you to see what I started with.
You can do it, too!
Original post 1/17/13

Thursday, April 25, 2024

PAINTING BLACK & WHITE CHECKERED CORBELS FOR PATTI'S NEW HOME

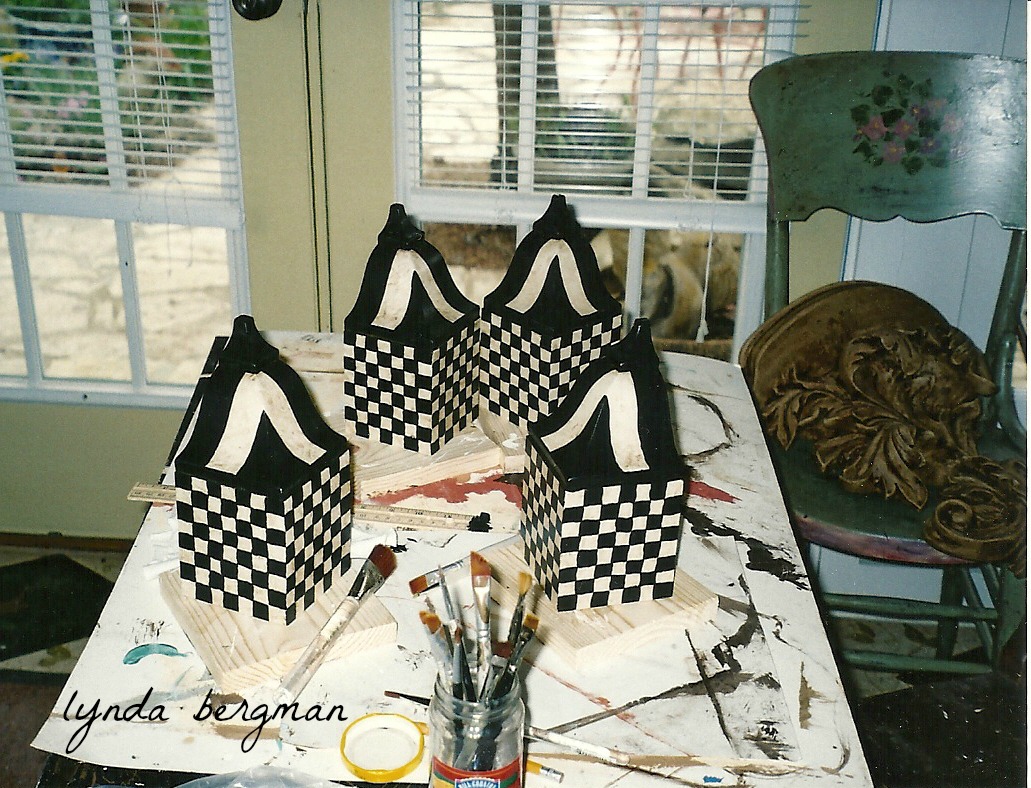
This is a project that Patti wanted me to do for one of the bedrooms in her new home.
These are corbels that she ordered for the corners of her room and asked me to paint them for her.  I painted them white, then PAINSTAKINGLY!! painted allll of those checks in black.
Next, I glazed with an aging glaze that I mixed and sealed them with a clear sealer.
They were not easy to paint, but turned out so wonderfully, 
like everything that Patti did for her new home.
The ceiling is papered and the corbels were a really decorative way to fill in the corners to meet her molding.  Believe me!! they look wonderful up there on her bedroom wall.
Original post:  4/26/13

Tuesday, April 16, 2024

HAND PAINTING STRIPES & FLOWERS ARTWORK ON A NURSERY DRESSER

HAND PAINTING STRIPES & FLOWERS ARTWORK ON A NURSERY DRESSER

Maria lives in Dallas and is expecting a baby girl at the end of December. Her mother has a beautiful dresser that is pink and white with a big bouquet of flowers on the front.  Maria wanted me to paint something like that for her baby girl's nursery. 
This is the dresser that I painted for Maria.
Maria's mom found this old dresser at a flea market. 
The style is very similar to the original dresser.
It was a bit wobbly and my neighbor did an old fashioned repair on the back, to make it more stable. He put a screw on each four corners and then attached wires and tightened them until the dresser didn't sway, anymore.
When he was working on the dresser, he pulled out a drawer, turned it over and this is what he found. Back in the 60's, we think someone was doing homework and studying the states and capitals of the United States.  Was so neat to find this!
This is the old dresser as it sat in the flea market.
Maria's mom sent her photos of the dresser I painted for her and her mom said she was very happy and loved it!  That made me feel good, too.
Next week, it will be on it's way to Dallas, just in time for that sweet baby's arrival.
Original post:  12/21/12.

Tuesday, April 2, 2024

BLACK DISTRESSED PAINT SAMPLES FOR A KITCHEN ISLAND

BLACK DISTRESSED PAINT SAMPLES FOR A KITCHEN ISLAND

A designer/contractor has asked me to bid on painting a kitchen island.  The other kitchen cabinets are a really nice medium brown stained.  They are thinking they want a black distressed finish on the island.  So, I made these samples for approval.
Paint black and rub the edges with a rag.
I love the middle one.  I think the bottom one is the designer's choice.
Black is such a good accent color in almost any room.  
And, as always I love old distressed finishes.
When I was in the really beautiful home, they were also talking about removing a high wall and leaving a load bearing beam exposed.  They wanted the family room and kitchen to be open to each other.  I might be faux painting that beam to look like some kind of wood.  We'll see what happens and of course I'll share the final results with you.  It might be a while, though.
I really like my job!!
Original post 10/18/14.

Friday, March 1, 2024

HAND PAINTING MIRROR & PICTURE FRAMES FOR PAULA'S NEW HOME

HAND PAINTING MIRROR & PICTURE FRAMES FOR PAULA'S NEW HOME

Remember that  
I posted back in September?
Paula is still working on her decorating and asked me to help her change the colors on a mirror frame and a picture frame.  They were both metallic gold and very beautiful, but she thought they no longer looked good with the gray tones she picked for this new home.
Thank goodness she has this huge island in her kitchen.
It was a perfect work table for the painting.
This is the very large picture frame.  On the right you can see the "before" metallic gold.
 Paula had several colors of paint from her renovation and asked me to use a dark greenie gray for this frame.
I painted on and rubbed off the greenie gray.  On the smooth areas I rubbed more off, leaving the paint a little heavier around the decorative design.  That gave it an "antique aged" look.
This is where Paula plans to hang the painting.  Those walls are gray and my camera made them look kind of greenie blue.  The new color on the frame looks really nice.
And, this is wonderful Hank.  He's a huge Maine Coon Cat and a really cute personality.  When I laid down my bags, he immediately sniffed around and then laid on top of them.
His mom says he likes me...I LOVE him!!
Last night Paula sent this picture to me.  
He's so funny!
This is the mirror frame.  Paula wanted it to be a soft gray.  
When I finished painting it she thought it didn't look dark enough with the walls in the dining room, so I rubbed a dark blacky brown on top of the soft gray.  It was a good contrast.
This is how it turned out.  Looks really good on the soft gray walls, now.
In the first picture above you can see Paula's kitchen light fixture.
This is the light fixture she chose to go across the room above her breakfast table.
Here is another post to some frames I painted last year:
If you have any questions about painting frames, please feel free to message me.
Original Post 12/5/16

Friday, February 23, 2024

PAINTING SHUTTERS METALLIC GOLD & LEOPARD SPOTS

PAINTING SHUTTERS METALLIC GOLD & LEOPARD SPOTS

Patti is one of my favorite clients.  
I love the projects she has asked me to paint for her home through the years.
She had a small window in one of her hallways.  She found these shutters that were just the right size and asked me to paint them metallic gold and leopard spots.
She asked me to paint this curtain rod and finials black and metallic gold to go in an adjoining bedroom.  The colors matched the colors in the shutters.
First, I painted the inside shutter part a solid black.  When I painted the metallic gold over the black shutter part, I kept touching/blotting it with a rag.
That's why you are seeing the black coming through the gold.
 The undercoat for the outer frame where the leopard spots are, I painted a beigy off white.  Then, painted the metallic gold over that.  Next, I started drawing black squiggly lines with an opening. I painted a different color of metallic gold inside the squiggly lines.
 It's ok that they're not perfect.
 I used a black craft paint for the black and craft metallic paint for the two golds.
I did not seal these shutters because they were on a high window, so not a lot of traffic.  Sometimes, when you seal a metallic paint it dulls the finish.  Once I painted a lot of metallic paint in a dark bathroom, knowing it wasn't going to reflect a lot.  Then, I thought to use a high gloss water based sealer and it turned out great in the dark bathroom.
The metallic paints did reflect really well.  
Remember, metallics "reflect" light.  Without a light source it's just a color.
The high gloss in that bathroom was perfect for that dark area.
The carpenter separated the shutters and put one on each side of the window.
Such a great idea, Patti!
They looked really, really cute/great/wonderful!!
Original post 9/14/17.
~
VISIT MY
STILL WORKING ON IT ~ ADDING MORE & MORE TUTORIALS
VISIT AGAIN, SOON