HomeMi CasaTutorialsInteriors etcMurals and ArtworkPainted Furniture

Wednesday, July 31, 2024

DRAWING & PAINTING FAUX BRICKS FOR A TEENAGE BOY'S ROOM

DRAWING & PAINTING FAUX BRICKS FOR A TEENAGE BOY'S ROOM

Kimberly was redecorating her teenage son's room and asked me to draw and paint bricks on the wall behind his bed.
She wanted the bricks and mortar to be in the gray and black tones.
I used a grayish white for the bricks.
And, she wanted them uneven and smudgy, so that's what I did.
This is Paisley.  Beautiful little doggie.
She is one spoiled baby.  She likes to be in her mommy's arms.
Is she snubbing me!
First, I painted the mortar color on the wall as a base coat.  Then, I started painting the individual bricks.  I swiped and smudged with my brush and let some of the base coat show through.  I was going to come back with a little brush and make the grout lines a little darker and more uneven.  Then, Kimberly decided she wanted the grout to be even darker.  So, I used a dark blackie gray and with a little brush I painted the grout lines.  Also, I lightly painted a second coat of  grayish white on the bricks. 
On the internet, she found the cutest large wire bear head.  
I think she's is going to get it to hang over her son's bed.
When I paint bricks a harlequin pattern, stones or stripes I always draw a grid on the wall.  It's just easier for me to follow.  It takes a couple of extra hours, but I have a guide to paint by.  Every other row of bricks has to be moved over and if I didn't have the grid I know I would have it all messed up and uneven.  I know that because the very first time I ever drew a harlequin pattern I started getting them uneven.  That's when I knew I would always have to draw a grid first.
Kimberly told me the size she wanted the bricks to be. 
 I measured at the top of the wall and drew the lines vertically.  Then she decided how wide she wanted the bricks and  I measured and drew horizontally.  I always use my level when I'm drawing lines.
She had a painter paint my gray base coat color on all of the other walls.  They were a beige.
Monday, I'm going back to Kimberly's to paint her kitchen cabinets.  I'm eager to see if she got that wire bear head for over the bed.  If she did I'll show it to you.
Thank you Kimberly!!
~
Here is a link to another brick wall that I painted and tutorial:
(Original post on August 2, 2015)

Sunday, July 28, 2024

HAND PAINTED RED KITCHEN CABINETS WITH A DISTRESSED, AGED TECHNIQUE/FINISH

      HAND PAINTED RED KITCHEN CABINETS WITH A DISTRESSED, AGED TECHNIQUE/FINISH

When my client moved to a new home she asked me to paint her cabinets in her HUGE new kitchen.  Her husband loved red!  Their sofa was red and they had quite a few red accents.  So, I suggested she let me paint the kitchen cabinets red.  I knew it would look soooo good in this new house with all the wall colors, her furniture and decor.  She just could not see the red and brought in a decorator and a builder and got their opinions.  I don't remember exactly, but I'm sure they weren't in favor of the idea of a huge red kitchen, because I had to keep begging!!!  Her husband liked the idea of the red kitchen, so my client finally, reluctantly, said ok.
When I paint a distressed technique on cabinets or furniture it is always with several layers of paint.  I painted these cabinets red.  Then I distressed and sanded the paint so the brown wood would show through.  Applied and wiped off a dark stain.  Last, I sealed with two coats of clear sealer.
My client had seen my faux "antique copper" finish, so she asked me to paint her vent hood.  I did a lot of embossing with a stencil around the border and in the middle of the top.  Then, applied the "antique copper" finish.  I painted metallic copper and glazed with a dark glaze.  Last, I painted the embossed design with a tiny brush and metallic gold paint.
Her wet bar was attached to the kitchen, so she wanted the same red, distressed finish on these cabinets, too.   This was a very large kitchen and wet bar with lots of cabinets.
Well, I think I was right to keep insisting on the red kitchen.
She and her husband absolutely LOVE it!!
They entertain a lot and she told me that everybody who sees her red kitchen loves it, too.  She feels good that it is unique.  And, she knows that no one has a kitchen like her's!
This is a ceiling medallion she asked me to paint for her new living room.  They were hanging a new chandelier on the very high ceiling and wanted the medallion painted red. 
Of course, it looked great, too!! 
She has great taste and I loved working with her and her husband.
Are you brave enough to do this??  Paint your kitchen red?
You just might love it, too!
Original post 10/4/2012

Tuesday, July 16, 2024

PAINTING A BASEBALL WALL FOR A NURSERY & TUTORIAL

Jill and Kevin are expecting their second child in a few weeks and it's a boy.  They had his room painted a beautiful blue with white trim and the furniture is very dark stained wood.
They LOVE baseball and wanted a baseball theme in their baby boy's room.  So, Kevin Googled baseball themes and several hand painted baseball walls came up.  
They asked me to paint one wall to look like an old baseball.
When I arrived to work on the wall, they already had it painted with a basecoat and Kevin had drawn the two big curves for the stitching.  He drew them with a pencil and did a great job.
I Googled baseballs and found a picture of a dirty old baseball.  That was my "inspiration".
It looked sooo cute and they were so happy with the way it turned out.  Now, they can finish decorating and get ready for that sweet baby boy to arrive.

TUTORIAL 

As I said, they had already painted a satin finish off white base coat.  And, Kevin had already drawn the two big curved seam lines on the wall with a pencil.
First, I painted over and gently shadowed with a dark brown paint, the seams/big curved lines that Kevin had drawn. Then, with a small brush I painted the stitches a dark red.  At the end of each stitch, I painted a dark brown dot to look like the needle holes.  I used the tip of my brush handle, dipped it in the paint and touched the spot where I wanted the needle holes to be.  Then, I used a very light brown glaze that I had mixed and I faux painted the whole wall to look like an old baseball.
When I found the picture on Google, I noticed that some of the stitch arrows were pointing up and the stitches on the other side were pointing down.  I showed it to my neighbor and he told me it was a mobius strip/circle.  It's interesting, if you want to look it up.
So, when you are painting your baseball wall, remember the two-way arrows.
Have fun!  It was fun for me!
Original post was 12/17/12

Thursday, June 27, 2024

PAINTING ANITA & GERALD'S RED BREAKFAST ROOM CHAIRS TO BLACK & METALLIC GOLD

PAINTING ANITA & GERALD'S RED BREAKFAST ROOM  CHAIRS TO BLACK & METALLIC GOLD

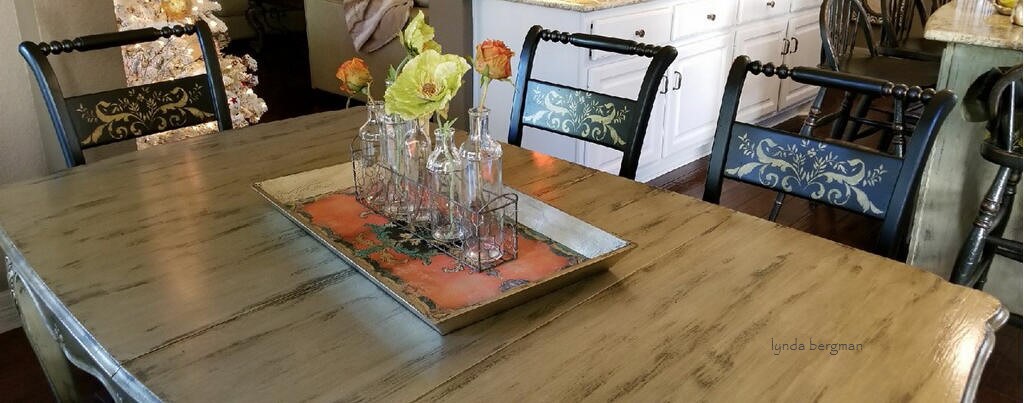
This is the breakfast room table I painted for Anita.
She asked me to paint it a metallic silver finish.
Her chairs were red and she liked the red, but thought she would be happy with them painted  black since she was making a lot of changes in her decor colors.
So, I painted them black with metallic gold artwork.  I used a stencil for the design.
Painted black they look sooooo beautiful with her metallic silver table.
As I painted the table I left those dark streaks.  That really ties in with the black chairs, too.
I love, love this picture!!  It's been hard for me to catch the silver "metallic" finish with my camera.  After Anita picked up the chairs and took them home she sent these pictures to me.  You can see the "metallic" silver table and "metallic" gold on the chairs "reflecting" light.
On the chairs I painted a hard finish black satin paint and sealed with a satin sealer.
They should hold up very well to the natural wear and tear of family use.
These colors are just wonderful with Anita's new breakfast decor.
The stencil I used looks like rooster feathers to match the chair cushions.
Painting chairs in my studio.
Anita's paint projects are almost completed.
I'm really proud of the way everything has turned out.
"Before"
~
Here is a link to Anita's kitchen and paint projects during November & December:
PAINTING ANITA'S KITCHEN CABINETS
~
FOR HOME DECORATING PROJECTS & TUTORIALS
VISIT MY
LYNDA BERGMAN DIY BLOG
Original post on 12/11/17

Sunday, June 16, 2024

MY LATEST COMMISSIONED ARTWORK ~ A BEAUTIFUL SCENE OF TELLURIDE, COLORADO

Jodi and David love Telluride, Colorado.
Recently, on their way home from their vacation in Telluride they sent one of their pictures to me and asked if I would paint this scene for them.  Yes, I could do that.  And, I did paint the scene for them.  Jodi knew just where she wanted to hang this painting, so she purchased a canvas to fit that wall.  
2' x 3'. 
Jodi and David are very happy with my painting.
I am very happy, too.

Sunday, June 2, 2024

BUILDING A JEWELRY DISPLAY SCREEN & SEWING A CANVAS CARRYING BAG FOR ELIZABETH'S CRAFT SHOWS & TUTORIAL

BUILDING A JEWELRY DISPLAY SCREEN & SEWING A CANVAS CARRYING BAG FOR ELIZABETH'S CRAFT SHOWS & TUTORIAL

Elizabeth loves to make jewelry.  She goes to Southtown and different craft shows
where artists display their art and crafts for sale.
She mentioned she was working on her jewelry displays and needed a bigger table, etc.  So, for Christmas I surprised her with a larger display and canvas bag just the right size to carry it.
For strength and to be able to add more nail hangers on the frame I made it out of 1"x 2" trim pieces.  I made two frames and nailed the chicken wire between the two frames. 
 Lightly sanded all of the edges and corners for a softer, more rounded look.
I added a handle on top for easier carrying.  Then, I spray painted it black.  I suggested she use Christmas ornament hooks to hang her jewelry.  She'll figure that out.
After the frame was finished I could figure out the measurements for her canvas carrying bag. 
 I always have lots of canvas cloth on hand.  Before I measured and cut the fabric, I washed and dried to "size" it. That way, she can wash it in the future without it shrinking.  
Then I sewed the bag.  I sewed french seams to prevent fraying. 
I wanted her name to be in my handwriting.  So, I wrote her name on a piece of paper.  Used graphite paper to trace it onto her canvas bag.  Then, I used black craft paint to paint it.  Used textile medium to thin the paint a little and to make sure it soaked into the fabric.
Put the bag in the dryer, wrong side out, for about 10 minutes to "set" the paint.
I want to be a carpenter!
I have tools and saws and everything I really need.  But, when I build something it never turns out perfectly like a real carpenter's work.  Once I paint it covers up a lot of my imperfections.  Even when things are not perfect, I think of  Ralph Waldo Emerson's
"The only gift is a portion of thyself"
So, that makes me feel better.
Elizabeth was surprised, happy and thrilled with my gift.
Me, too!
After Christmas sales, she's a little low on merchandise, but here is link to her ETSY SHOP:
Original post:  12/28/15

Friday, May 17, 2024

AN EXCITING NEW & MODERN LAUNDRY ROOM FOR MY CLIENT ~ PAINTING & REMODELING

AN EXCITING NEW & MODERN LAUNDRY ROOM FOR MY CLIENT ~ PAINTING & REMODELING

My client wanted to remodel her laundry room.  She asked me to paint her cabinets, walls and ceiling.  The darker color in this picture is the actual color I painted on the cabinets.  The light from the window is playing tricks with the new paint colors.
She added new granite counter tops and flooring.  A newly built cabinet is on the left of this picture by the sink.  It goes all the way to the ceiling.  To make the cabinets look consistent, she had her carpenter add new panels above the existing cabinets.  (picture below) 
The overall look is so nice, now.  One of my favorite things is the new enclosure and granite top added over her washer and dryer.  Before, the washer and dryer were free standing.  Her carpenter building and adding this enclosure gives my client more flat surface for folding clothes, etc.  
These two are new cabinets.  I think they were just doors and cabinet, before.  These new enclosures are room for tall clothes hampers.
New tile flooring.  I love her new floor!
New light fixture with a fan in it.  
On the left is the newly built cabinet that goes all the way to the ceiling.
This pictures shows you the new panels the carpenter built and installed so the cabinets would be consistently tall to the ceiling.  It makes the whole room look better.
Me painting the new upper panels and trim.
I forgot to take a picture of "before".  This is a wonderful laundry room re-do with lots more cabinet/storage space and it is really beautifully decorated.
Original post was on 9/9/2019.