HomeMi CasaTutorialsInteriors etcMurals and ArtworkPainted Furniture

Wednesday, February 26, 2014

PAINTING DENIM & TURQUOISE STRIPED TABLE FOR PATTI'S BEACH HOUSE

PAINTING DENIM & TURQUOISE STRIPED TABLE FOR PATTI'S BEACH HOUSE

Patti is still decorating her newly built beach house.
She brought this sofa table over and asked me to paint stripes on it.
She chose a denim color and a lighter turquoise blue for the stripes.  
I love the contrast of the two colors and 
I LOVE the way it turned out!!!
I think you can see in this picture that I sanded and distressed all the edges, just a little bit.
Before she saw it, I sent Patti a couple of emails telling her how CUTE it turned out...just teasing her.  But, I wouldn't send her a picture.  It's always best to actually see the piece.
This is the table "before".  
It is long and narrow and I loved it the way it was before I painted it.  
But the boss, Patti, LOVED the new colors. 
 She said it might be her favorite piece that she's had me do in a long time.
I suggested that she tell her grandbabies that this is her "cat in the hat" table.
When she picked up this table, she brought me a HUGE beautiful mirror to paint a light orangey color.  Remember orangey colored dreamcicles??  I wonder if they still make them.  When I was a little girl, I could hardly wait to spend my nickels on a dreamsicle.
~
TUTORIAL

If you want perfect stipes you use tape or you measure, draw and paint very carefullly.
Patti likes things to look hand painted and not perfect.  I do, too.
I painted the denim base coat.  With a pencil and ruler I measured and drew the stripes.
If you want the stripes to start and end with the same color, keep that in mind when you are measuring for your stripes.  I used a brush and painted linear strokes (no tape).
I painted only one coat of turquoise and let some of the base denim color show through.  
I think that looks old and weathered.
Last thing is to paint two or three coats of a low sheen clear sealer. 

Saturday, February 22, 2014

PAINTING & DISTRESSING TEAL & BLACK CABINET FOR NEW POWDER ROOM SINK

Isn't this the neatest little chest?
My client is building a new home.  She delivered this unfinished cabinet to my studio and told me she wanted me to paint a teal bottom with a black top.
She will be placing a stone sink on the top, so the browns and beige undertones will look really nice and tie in with the stone finish.


After I painted and distressed, I painted on and rubbed off a dark stain to match the black top.


I love to distress and age furniture.


This top is distressed a little heavily, but I wasn't sure about the size of the sink and how much surface it would cover.
When she came to pick it up, she was very happy with the new finish.
That's what I care about!
Making my client happy with my work.

Friday, February 21, 2014

PAINTING NEW EXTERIOR SIDING & TUTORIAL

A couple of months ago my friend Gus replaced some siding on my sewing room walls.  He replaced it with Hardie which will last forever!


A couple of days ago, I removed the mildew with  my garden sprayer.  I used 1/2  bleach and 1/2 water.  I wish I had an organic way to get the mildew off, but this is the best solution I know.  After a very few minutes when the mildew was gone, I soaked the area very well with lots of water, trying to dilute the chemicals as fast as I could.  The little geckos, chameleons, frogs and other little creatures are hibernating right now and I didn't want to hurt them with the chemicals.  I did see a gecko and a chameleon and they did not seem to be bothered, so I guess I watered it down fast enough.
After that dried very well, I caulked every single black crack, seam, nail and screw hole.  It keeps moisture out of your walls and trim and keeps bugs out of your walls.  
Caulking really does make the paint job look so much better.  


Freshly painted and looks sooo clean and nice!!
Those are the shelves where I store all of my flower pots.
Prepping and painting the exterior takes a lot of time.  So, I will paint only one or two walls at a time...only what I have time to get done in a day or so.  It's just too overwhelming to try to do more and I might keep putting off the painting that needs to be done.


All of the other garden things, I keep in my garden shed out of the weather.
Of course, this picture was taken last summer, when everything was green.
Can't wait for spring and everything green, again!!

Thursday, February 20, 2014

PAINTING STEPHANIE'S KITCHEN CABINETS TO AN AGED GRAY/BROWN SPECIAL FINISH

PAINTING STEPHANIE'S KITCHEN TO AN AGED GRAY/BROWN SPECIAL FINISH

This is Stephanie's kitchen "before" I painted it.
 The cabinets were the pickled/white washed oak finish.
She wanted me to paint a gray browny aged fnish to go with new wood flooring, tile and wall color in their kitchen family room area.
The darker color made it look really nice.
See those two short doors over the cooking range?  Those are the two they removed to build their new vent-a-hood.
Here is a link to that post:
Stephanie wanted her kitchen island and the cabinets in her family room to look a little different.  So, I painted both a little darker color and faux painted the doors and panels with a different technique.
These are the two different techniques I used for her kitchen and family room.
While I was there, they asked me to faux paint their dining room walls.  
The painters painted the kitchen wall color as the base coat and
 I used a darker brown to faux paint over it.
Stephanie has such a beautiful home and I'm proud that I got to be a tiny part of making it special.
Thank you, Stephanie!

Monday, February 17, 2014

PAINTING STEPHANIE'S NEWLY BUILT VENT-A-HOOD TO MY "ANTIQUE SILVER" SPECIAL FINISH

About three years ago, I painted this special, aged technique on Stephanie's kitchen cabinets.
A few weeks ago, she told me they were building a new vent-a-hood and wanted me to paint it, too.


They showed me a picture of the finish they wanted and I said "I CAN do that!!"  It looked a lot like my "antique silver" finish that I've painted many times.


I love how Stephanie chose this tile to go on her new vent-a-hood.  It goes so well with the metallic "antique silver" and metallic gold trim that I painted.  The tile reflects the light and just sparkles!
Remember, you might not see the metallic silver paint finish unless it is reflecting light, too.


My trusty old wooden ladder.
I was looking for the post to Stephanie's kitchen cabinets so I could give you a link to see them "before" the new vent-a-hood, but realize I've never shared that with you. 
So, that will be my next post.
Stephanie's kitchen cabinets before and after.


Stephanie replaced her ovens and needed me to paint the new little trim around that area to match her kitchen cabinets.  Thank goodness, I keep records of the paint colors, techniques, etc.  I've needed that information quite a few times for other clients, too.
And, this is the "before" picture of the newly built vent-a-hood.
It is made out of plywood and the builder primed it for me.
That was good, because Stephanie was hoping I could get it painted and finished for her
Superbowl Party!
My basecoat was called "Seahawk", but I never mentioned that because I didn't know who they would be rooting for.  Didn't want them to think I might have jinxed them with that paint color!!
Stephanie and her husband came home on their lunch break to see how it was going...I was finished painting and they LOVED how it looked with their kitchen and new appliances.
That made me feel good, too.

Saturday, February 15, 2014

COOKING YOUR EGGSHELLS FOR THE BIRDS...NOW IS THE TIME

Here in South Texas, the birds are calling for their mates and beginning to search for just the right secure setting for their spring nest.


This is the time to save and lightly cook your eggshells for the birds.  The calcium in the eggshells is very important, especially at this time of year.
One thing I have noticed is they seem to be more interested in the white eggshells.  This year, I'll pay very close attention to that  and will let you know if they really do prefer the lighter ones.
This is a link to my original post on my nature blog
BIRDS & DAFFODILS

Thursday, February 13, 2014

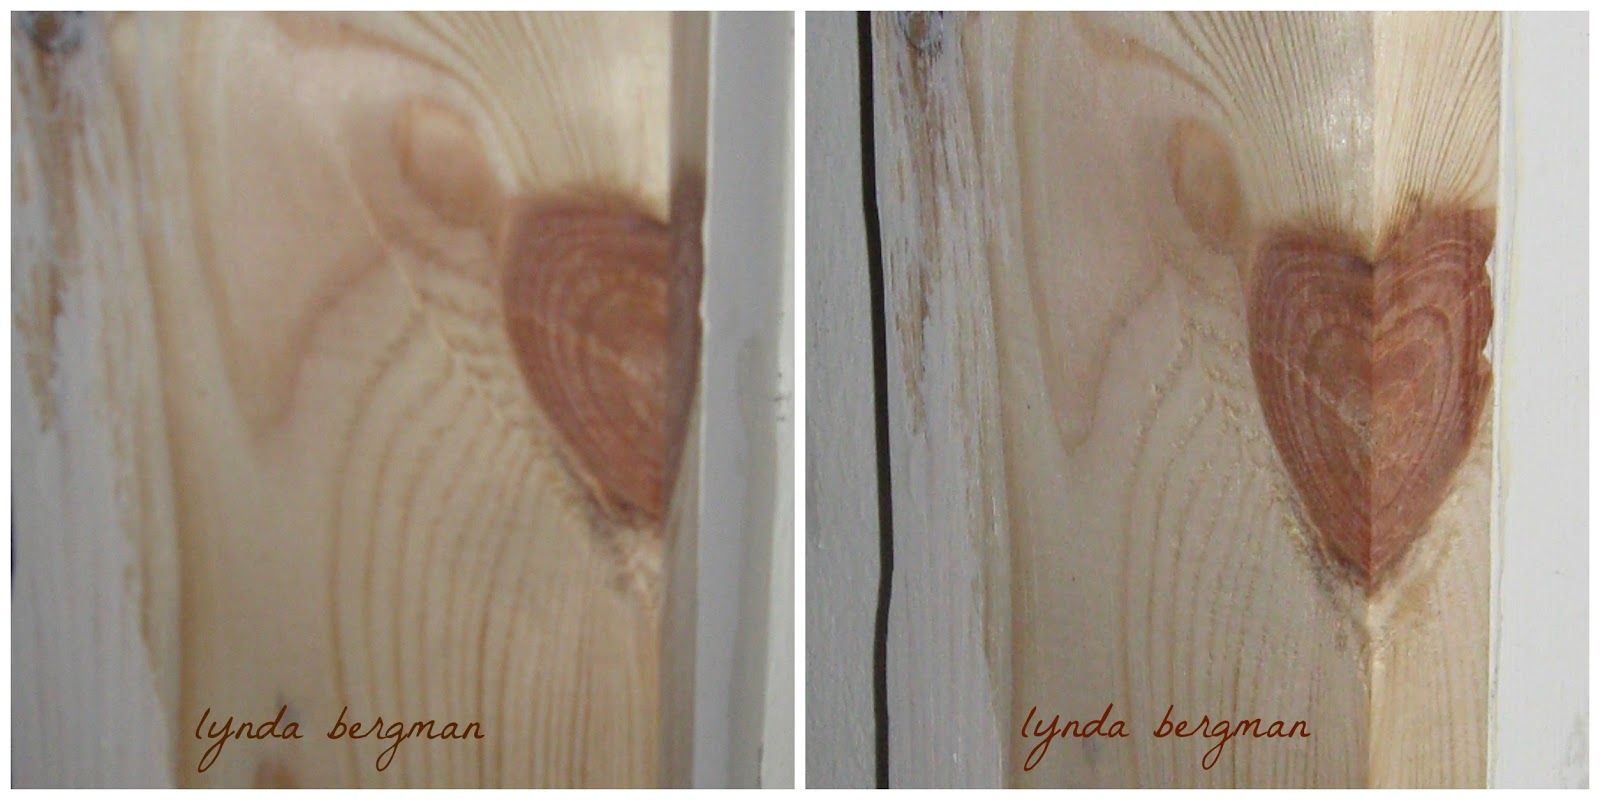
CAN YOU BELIEVE THIS HEART KNOTHOLE?? HAVE A SWEETHEART OF A DAY ON VALENTINE'S DAY

Can you believe this HEART KNOTHOLE??


Last weekend, my friend Gus put a wooden frame around my sewing/laundry/workroom window.  I wanted a place to hang sewing tools, etc.
When I was priming this wood to paint it, I saw this heart and couldn't believe it!!  Right here at this time of year...February 14!!
I love it!!


Yes, this is my sewing room and it has windows on two sides of the room.  I can see my backyard while I'm sewing, working or folding laundry.


And, I hammered nails into a beam that runs across the middle of the room.  The nails are so handy to hang my laundry.
My work coveralls!
And, the canvas bags that I use to carry my supplies and small equipment to work each day.
This might be my favorite room in my home.  It's 10'x15' and I can do so much in here.  Also, I have cabinets and drawers where I store sewing and craft supplies.
You can't see it, but I have a large work table against the wall on the left.  It's so handy for cutting out fabric or any project I might be working on.
I love this room!!

Monday, February 10, 2014

PAINTING A SOFT COLOR, LIGHTLY DISTRESSED SPECIAL FINISH ON KATHY'S KITCHEN CABINETS

Kathy was doing some major renovation to the downstairs of her home. 
 BEAUTIFUL new travertine floors throughout the living areas adjoining dark hardwood flooring.  And, new tile and granite in her kitchen.
Her kitchen cabinets had that pickled/white washed finish, so she and her decorator asked me to paint them to a softer special finish.  But, not yellow like the existing color.
Many times, cabinets are sealed with oil based polyurethane and oils tend to "amber" or yellow over time.


Kathy asked me to make a sample for her, using her newly painted woodwork color as the base coat and using the wall color to wash over the soft off-white.


I pointed to several of the new backsplash tiles and asked if that was what she was wanting and it was.
Her backsplash and new travertine flooring had soft beigy tanny tones.


Remember Kingston and Phantom?  I introduced them to you when I painted Kathy's master bath cabinets.  They were sooo sweet!
(a link to that post)


So, this is the finished product!! 
 I forgot to take a picture of the "before" pickled/white washed finish.  But, I guess you know what that looks like.
I think this turned out so pretty and soft with her darker floors and walls.
And, she did a good job choosing her cabinet hardware.  It's a really nice contrasting, yet blending color.  And, looks really good with her granite.

Saturday, February 8, 2014

"CAFE de PARIS" HEART WALL ART OR DOOR WREATH

Another 
VALENTINE
Door or wall art/wreath that I made.  
I painted the backside green, in case you want to hang it on a glass door.  
Add flowers and ribbons for a more festive look.


Here is a link to making the wooden hearts:

Friday, February 7, 2014

PAINTING A CRACKLED, DISTRESSED BLACK & GREIGE BEDROOM CHEST

Last year, I painted my client's great room cabinets and kitchen cabinets a greigy beigy crackled, distressed finish.  They were all visible in this one very large room.
 So, this year she had three pieces of furniture that she wanted me to paint in the same special finish.


On this first piece she wanted me to add black accents and a distressed black top.


I love the way this piece turned out, but you should see what she had me paint over!!
Don't faint!!
Don't pass out!!
HOLD ON TO SOMETHING!!


SHE HAD ME PAINT OVER THIS FABULOUS, BEAUTIFUL CHEST!!!
She had this piece for a long time and was tired of it and wanted to change the decor in her bedroom, thus, me painting over this beautiful chest.  The leg trim, smaller trim pieces and handles were brass and 
I PAINTED OVER IT ALL!!
It's beautiful now, too, but it wasn't easy for me to paint over all of that beautiful artwork.
But, that is my job.
It reminds me of several times that I've had to paint over my murals or artwork because a kid had outgrown it.
But, that is my job!

Tuesday, February 4, 2014

PAINTING A DISTRESSED & AGED FINISH ON LORI'S KITCHEN ISLAND

PAINTING A  DISTRESSED & AGED FINISH ON LORI'S KITCHEN ISLAND

This is another paint project for Lori's home.
She asked me to paint and distress her kitchen island.
Before I painted it, the finish was a pickled white-washed oak cabinet.
There is a lot of green in her light fixtures over the island and she wanted me to paint that same green on her island.
I painted the electrical plugs and switch plates to match the island.
It just looks so much better than to leave them white or black.
Now, it looks more like a piece of furniture than a kitchen cabinet.
The new paint colors look really nice with her granite, too.
This is her island before I painted it.
Look at the white electrical plug and plate.  Don't they look better, now?
This finish was Lori's idea and her new island looks soooo nice in her, already beautiful kitchen.

Saturday, February 1, 2014

PAINTING LORI'S GUEST BATH CABINETS TO AN AGED GRAY BROWN & LINK TO "HOW TO" EBOOK AVAILABLE

VISIT MY
LYNDA BERGMAN DIY BLOG
~
Lori was renovating her two upstairs baths.
She had the showers, flooring, granite, comodes, sinks, everything replaced.
She had seamless shower surrounds installed and they're really nice.
Then, she asked me to paint the cabinets for her.
I made samples and this is the finish she chose for her guest bath.  
The cabinet color looks sooo nice with her new granite, floor and tiles.  The other contractors finished their work before I came in.  That's always best so the new finishes don't get chipped or scratched.
Lori chose bronze faucets.
When I made the samples for her, I chose colors that would coordinate with her faucets and the colors in the granite.
Here is her new granite in the adjoining room.  
I love it!
For some reason, these border tiles came in with the edges unpainted.  Lori asked me to paint the edges to match the other colors in the tiles.  I used durable craft paints and dabbed the paint on.  Because the tiles were dull, I sealed the edges with a dull, clear sealer. 
When I show my clients samples, this color is the one most of them choose. 
It goes with just about any decor.  
The very most important thing is to get the color tones correct and matching everything else in the room.  That can sometimes be a real challenge.  But, I think I got it right with these two baths, thank goodness!!
With all of the colors Lori had to choose and coordinate, I think she did a great job and both baths turned out beautifully!!
~
After many requests for information on creating this cabinet finish, I have written a 20 page "how to" eBook with color formula and technique.  Here is a link to my eBook:
~
~
VISIT MY