Tuesday, April 30, 2013

I LOVE MY PICKET FENCE WITH BIRD FINIALS!

I LOVE MY PICKET FENCE WITH BIRD FINIALS

Years ago when Tony built my picket fence he cut out the design on every single one of the picket boards.  When I found these beautiful iron birds, I asked him to cut off some of the finial tops and attach these birds to my fence.  I just HAD to have them on my fence.
I wanted them to be randomly placed, so I chose and asked him to attach the birds on six of those fence posts.  I turned them different directions so they would look more interesting and I
painted them my fence color, a grayish off white. Then, I painted a rust colored paint here and there to make them look like they were old and rusted.
One time in Victoria magazine I saw an old rake being used as a holder of garden tools.  Not long after that I found two rusty old rake heads at a garage sale. 
I knew exactly what I would do with them.
I LOVE MY PICKET FENCE!!

Sunday, April 21, 2013

PAINTING YOUR GARAGE DOORS TO TROMPE L'OEIL BARN DOORS TUTORIAL

PAINTING YOUR GARAGE DOORS TO TROMPE L'OEIL BARN DOORS TUTORIAL  

 Yesterday a blogger emailed me and asked me some questions about the trompe l'oeil garage doors that I painted.  She said that she looked into the price of purchasing wooden garage doors and they were very expensive.  I made some suggestions about painting her garage doors and
 I want to share that with you.
     This blogger saw my doors featured on another website and gave me the link.  Selina at Creative Juices Decor posted about garage door makeovers and said some very, very nice things about my blog and my work.  Thank you so much, Selina!!
     And, here is a link to her blog about garage door makeovers:   CreativeJuicesDecor
These are the trompe l'oeil garage doors that I painted.  
They're the ones Selina mentioned in her blog.
~
And, here is a link to my post:
~
So, this is what I told the blogger who emailed me:  

"I do understand about the price of the doors. I think that was the reason my client asked me to faux paint her's.
If you don't know how to do a "woodgrain" look, I think you could just paint your doors a medium or dark brown. To make the hinges and handles (and your windows) my client showed me a photo of how she wanted them to look. I drew them on a piece of paper then traced them on the doors and painted them. If you paint a black or dark line down the middle of your garage door that should make it look like two doors. If you use exterior paint your work should be very durable. The only problem could be if they have direct sunlight shining on them.  
So, if you paint your doors and add hinges and handles I think they would look like wood doors from the street."
~
                           So to you, just in case you want faux wooden garage doors:


 TUTORIAL
I mentioned windows because she wanted windows at the top of her doors.  She could just draw them, trace them on the doors and paint them.
You can add anything you want to paint on your doors.
I have seen quite a few wooden garage doors in certain neighborhoods and they look dark and stained and have hinges on them. That's why I think you could paint the doors whatever color, add your painted on hardware, windows, etc. and that, to me, is trompe l'oeil.  At a glance from the street or from someone just passing by it might fool them into thinking they are wooden doors.
If you use exterior paint and it fades a bit that might be good and make them look older.  The good thing about just painting them is, if they get scratched you can touch them up with your saved can of paint. 
If you paint your doors, have fun!!  
Remember it's just paint and you can start over.
Would love to see photos if you paint your garage door.
~
 This is how I painted mine at mi casa.
This is my garage door.  I painted my sweet ol' Mr. Smith and some pots of flowers. 
See the kitty door in the middle of one of the flower pots.
~
VISIT MY DIY BLOG

Saturday, April 20, 2013

PAINTING A BEAUTIFUL CHANDELIER FROM SHINY BRASS TO A DARKER METALLIC FINISH

Lorraine's brass chandelier was really beautiful with tons of crystals, very, very sparkly.  It had been in her dining room for several years and she was tired of the shiny brass.  So, she took allll of the crystals off and brought it to my studio and asked me to paint away the shiny brass.


This is a photo of the new finish I used to cover up the brass.  In my studio, she picked out the shades of metallic paint she wanted me to use and asked me to top it off with a reddish metallic coppery color, as a bit of contrast to the other metallic golds and bronzes.


For every single crystal on this chandelier, there were two or three teeny tiny brass pieces like the wires, etc.  Thank goodness!! she kept those and worked on those while I was painting the chandelier.  But, there were a few crystal pieces that were permanently a part of the chandelier and I had to very carefully paint several layers around those.  It wasn't easy!!


You can't see the finish I did, but this is the way it looked when she picked it up to take it home.  Those smaller scrollie parts were very delicate and not easy to paint, but I finally finished all of the layers.
After she put it back together, I got to go look and take these photos.  It really does look beautiful in her dining room.  And, the bit of darker contrast that I painted gave the base more contrast to the crystals.  
She's very happy with it, now.
The great thing about paint is, if she ever wanted it to be shiny brassy looking again, I could do that!

Sunday, April 14, 2013

FRENCH GREY LITTLE OLD DRESSER...VERY OLD, BUT NEW AGAIN!!

A while back, I showed you a very old green dresser that my neighbor put out for the trash to pick up.  I asked if I could have it and, finally, painted it last week.


I used a french grey and antiqued parts of it with a rich chocolate brown.


The stripes are painted in the rich chocolate brown, too.  Then, I added these zebra knobs, which I think MADE this dresser!!  


This mirror used to be a bright green that I painted.  But, I thought it would really dress up this little dresser if I painted it to match.  I painted it the french grey, then antiqued it with the rich chocolate brown.  Then, I highlighted the decorative trim with a metallic gold.


This is the little dresser as I found it on the curb, waiting for the trash.  On the back of the top, where the mirror used to be, I filled in with a wood filler.  Then, primed, painted and sealed it.  
Yesterday, one of my friends was having a big neighborhood yard sale and this little dresser SOLD!!
It was really cute and I'm so glad someone wanted it.  Now, it will live on, instead of being in a trash heap, somewhere.

Wednesday, April 10, 2013

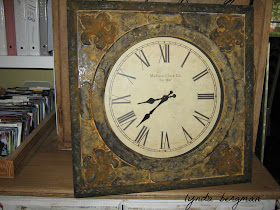
PAINTING TWO CLOCKS: ONE IS A RUST SPECIAL FINISH & THE BIRD CLOCK IS CRACKLED & DISTRESSED

This is a new clock that I refinished and painted with the "rust" products.  I love working with "rust", but I can never know for sure how it's going to turn out.  So, I just keep working it until I'm happy with the look.  You can paint "rust" all over a piece or you can just apply it in certain small or large areas.  I do love the way this piece turned out, though.


And, this is a new clock that I painted, crackled and distressed.  I found this iron bird and screwed it to the top of the clock.  I really like the way this turned out, too.  I usually do keep working on a piece until it turns out the way I want it to.  Sometimes, I have to re-do a couple of times until it's right.  I don't mind re-doing because adding more and more paint just makes it look layered and older.  Oh, and I added that little fleur de lis at the bottom to cover a hole.


The rust clock and my distressed iron bird clock have both been sold, but I just wanted to share the finishes with you.

Saturday, April 6, 2013

PAINTING ARTWORK ON RUTH'S OLD METAL GARDEN SHED

Ruth is my friend.  I was doing some painting for her and she asked if I could do anything with her old metal garden shed out back.  I wanted to paint flowers on it and she mentioned hollyhocks because they reminded her of home, back east.  So, that's what I painted for her and it really spruced up that little garden shed!


To paint the artwork, I used craft paints like Americana, Ceramcoat, FolkArt and Apple Barrel.  They are acrylic and wear very well outdoors.

Wednesday, April 3, 2013

THANK GOODNESS I'M IN THE MOOD TO SEW ! I REALLY NEED NEW PAINT COVERALLS

It's about time!!  I'm finally in the mood to sew and I desperately need new coveralls.  I'm always wiping my painted hands on my coveralls, so they are loaded with paint.


And, when I paint low on the walls and baseboards, I'm always sitting down and scooting along, getting it painted.  So, I wear out the bottoms of my coveralls and I do patch them, often.


I've already cut out a pink pair and, now I'm getting ready to press and then cut out a pair in this sea foam green.  Slowly, I'll get those other colors cut out and sewn, too.


This is a thread collection of many years.  Thread lasts forever, so I nearly always have any color I need, from a past project.  Those scissors were a birthday gift when I was 14.  Because I am left handed, it's so much easier to cut with left handed scissors.  The pinking shears are left handed ones, too.


This pair of coveralls, I made a long time ago.  I put eyelet lace across the front bib.  Those were really cute.
Lots of times, women have told me they really like my coveralls, so I'm going to cut out some copies of the pattern that I designed many years ago and put them in my Etsy shop.  I'll do that very soon.

Monday, April 1, 2013

UPDATE: FINALLY RETRIEVED "BEFORE" PHOTOS FROM MY OLD, BROKEN, GONE KAPUT COMPUTER

Finally! I got these last few photos from my old, broken computer.  And, I'm really liking my new computer.


This is the wonderful old cabinet that my client found and it needed, so she added two new doors.  She had a carpenter make them for her and she brought this piece to me so I could match the doors to the existing finish on the cabinet.  I layered the paint, distressed and stained it, working to get as close as I could to the existing finish.  You might be thinking that I got the wrong color, but that's how you layer colors and stains to make a piece look old.  This is a link to that post:

And, this is a BEFORE photo of the fancy wrought iron table:


and, the white doors that I painted and stained to match my client's bathroom cabinets.


So glad I finally retireved them from that old computer.  I logged on and worked my way around and emailed these photos to myself.  Later, I went back to the old computer and tried to log on again, and it was REALLY broken, gone kaput, this time.  Thank goodness, it allowed me to get my photos!!
Link to this post: